2000 Ford Focus Logo
Curtis Giboney Posted on Aug 02, 2012

Serpentine belt diagram for 2000 ford focus

Where is the tensioner pulley?

1 Answer

Anonymous

Level 1:

An expert who has achieved level 1.

New Friend:

An expert that has 1 follower.

Corporal:

An expert that hasĀ over 10 points.

Problem Solver:

An expert who has answered 5 questions.

  • Contributor 9 Answers
  • Posted on Aug 02, 2012
Anonymous
Contributor
Level 1:

An expert who has achieved level 1.

New Friend:

An expert that has 1 follower.

Corporal:

An expert that hasĀ over 10 points.

Problem Solver:

An expert who has answered 5 questions.

Joined: Aug 02, 2012
Answers
9
Questions
0
Helped
7777
Points
31

Belt diagrams can be found at most NAPA auto parts stores. The tensioner is located on the front of the engine, usually above the other pulleys that the belt goes around.

5 Related Answers

Anonymous

  • 1 Answer
  • Posted on Mar 31, 2009

SOURCE: Belt Tensioner located on 2000 ford Escort zx2

On the right side of the pulleys, there should be 3 top, middle, and bottom. The middle, smaller one, is the tensioner.

Ad
Molson02536

Harvey N Tawatao

  • 3854 Answers
  • Posted on Apr 08, 2009

SOURCE: need a serpentine belt diagram for 2005 ford focus

You should have that diagram on the inside of your hood or on the fan shroud. Good luck

Anonymous

  • 3533 Answers
  • Posted on Apr 20, 2009

SOURCE: belt diagram

for the most part there is a diagram under the hood showing you how the belt goes back on you can try www.autozone.com to see if they have your car listed but this is what i do i draw a diagram of the old belt before i take it off and that way i know how the new one goes on.

Anonymous

  • 10 Answers
  • Posted on May 03, 2009

SOURCE: serpentine belt diagram for my Ford V6 4.2L 97'

Lower left is the tensioner and above should the idler. Sometimes there is a diagram on the fan shroud or near the radiator. Without a picture I hope this makes sense.
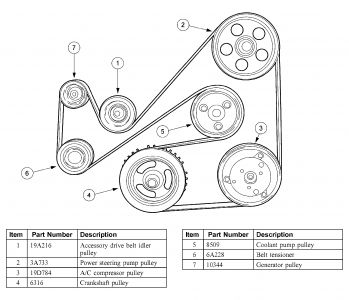
Starting with the ac going over the top of its pulley and down to the power steering, to and under the crank shaft, going in and up and around left over the water pump to the tensioner (going under) and to the alternator over the top and then under the idler.

Anonymous

  • 667 Answers
  • Posted on Sep 22, 2009

SOURCE: 2002 Ford Escort ZX2 serpinten belt routing & tensioner pulley

go to www.gates.com on the lower right hand side under popular topics, click on timing belts, then on the left hand side click Parts Locator and Interchange, enter your cars info and the first page that comes up will show you a camera icon for a pic of how your belt is routed. The tensioner pulley is the one mounted on a silver arm, usually at the top. Hope this helps let me know.

Ad

Add Your Answer

×

Uploading: 0%

my-video-file.mp4

Complete. Click "Add" to insert your video. Add

×

Loading...
Loading...

Related Questions:

0helpful
1answer

Serpentine belt is too loose on my ford focus 2000 se

Tensioner pulley is most likely worn out; however, with it running loose like that, I would suggest replacing the belt with the tensioner.
0helpful
1answer

Drive belt routing diagram w reg ford focus

Somewhere under the hood, usually on the fan shroud or near the radiator, there should be a sticker with a diagram of the belt routing, 2001 may even be on the hood. On this diagram it will show a tensioner pulley and idler pulley and the approximate location. Most Fords use a 15mm or 16mm bolt on the tensioner, this is where you put a wrench to rotate the tensioner and remove the belt. When you turn the tensioner bolt turn towards the front of the car, there will be a lot of tension so pull hard.

Also Dayco.com offers a free online comprehensive serpentine belt reference tool - including routing diagrams and tensioner information.
1helpful
1answer

Serpentine belt diagrm

Not sure if you have the 3.0L 2V or the 3L 4V so heres both. Hope it helps.. Cobra,, :-)
Accessory Drive Component Locations 3.0L (2V)a0007698.gif
Item Part Number Description 1 10346 Generator pulley 2 8678 Belt idler pulley 3 3A733 Power steering pump pulley 4 8620 Drive belt 5 2E884 A/C clutch pulley 6 6B209 Drive belt tensioner pulley 7 6312 Crankshaft pulley 8 8509 Water pump pulley

Component Locations 3.0L (4V)a0007699.gif
Item Part Number Description 1 3A733 Power steering pump pulley 2 8509 Water pump pulley 3 2E884 A/C clutch pulley 4 8620 Drive belt 5 6312 Crankshaft pulley 6 6B209 Drive belt tensioner pulley 7 10346 Generator pulley
1helpful
1answer

How to replace a zx2 serpentine belt

Click on the following free direct Link. It has the correct Serpentine/Drive Belt Diagrams for your 1998 Ford Escort ZX2, 2.0L DOHC In-Line 4-Cylinder Engine.
The Link says 2000 for the Year, however this is the same as the 1998 Year Model.

http://www.2carpros.com/car_repair_information/year/2000/make/ford/model/zx2/2000_ford_zx2_drive_belt_routing_diagram.htm

"HOW TO":
Standard Rules to Removal the Serpentine Belt with an Automatic Tensioner:
1. Find the Tensioner(s). (See Diagrams on Link)
2. Using a Serpentine Belt Tensioner Tool, Or Wrench OR Ratchet, Rotate/Move the Tensioner USING THE AVAILABLE NUT (on the Pulley or Arm Base) OR the OPENING (3/8ths or 1/2 inch square opening) rotating the Tensioner Pulley/Arm - moving it away from contact with the belt and towards the area where the belt is not in contact with the Tensioner Pulley. The Tensioner is spring loaded, and is hard to rotate/move.
3. Remove the loosened belt off one of the other more easily accessed Pulleys.
4. DO NOT quickly release the Tensioner, but gently allow the Tensioner to rest in its closed position.

Standard Rules for Installing the Serpentine Belt with an Automatic Tensioner:
a. Pick a Pulley that is most easily accessed. This will usually be on top. This will be the last Pulley that the belt will go on.
b. Using the Diagram: Install the new Serpentine Belt on the remainder of the Pulleys....over, under, left right.
c. Using a Serpentine Belt Tensioner Tool or Wrench or Ratchet Tool: Rotate/Move the Tensioner Pulley/Arm "away" from Belt contact area on the Tensioner. This spring is pretty hard and with a new belt, it will be even harder to install. Rotate/Move this to as-close to the maximum allowed inorder to have enough slack in the belt to get it up and over the last pulley.
d. Using your other hand - Pull the Belt up and over the Last remaining Pulley.
e. Before releasing the pressure on the Tensioner, visually inspect the remainder Pulleys and the Belts' Positioning on them.

Let me know if this helped, or if you have additional information questions. Feel Free to contact me at FixYa.com!
3helpful
1answer

How to replace serpentine belt on mitsubishi diamante 2000

Click on the following free direct Link. It has the Serpentine Belt Diagram and Tensioner location for your 2000 Mitsubishi Diamante.

Let me know if this helped, or if you have additional information or questions. Feel Free to contact me at FixYa.Com!

http://www.2carpros.com/car_repair_information/year/2000/make/mitsubishi/model/diamante/2000_mitsubishi_diamante_drive_belt_routing_diagram.htm

GENERAL/Standard Rules to Removal the Serpentine Belt with a Tensioner:
A. Find the Tensioner(s). (See Diagrams on Link)
B. Using a Serpentine Belt Tensioner Tool, Or Wrench OR Ratchet, Rotate/Move the Tensioner USING THE AVAILABLE NUT (on the Pulley or Arm Base) OR the OPENING (3/8ths or 1/2 inch square opening) rotating the Tensioner Pulley/Arm - moving it away from contact with the belt and towards the area where the belt is not in contact with the Tensioner Pulley. The Tensioner is spring loaded, and is hard to rotate/move.
C. Remove the loosened belt off one of the other more easily accessed Pulleys.
D. DO NOT quickly release the Tensioner, but gently allow the Tensioner to rest in its closed position.

Standard Rules for Installing the Serpentine Belt with Tensioners:
a. Pick a Pulley that is most easily accessed. This will usually be on top. This will be the last Pulley that the belt will go on.
b. Using the Diagram: Install the new Serpentine Belt on the remainder of the Pulleys....over, under, left right.
c. Using a Serpentine Belt Tensioner Tool or Wrench or Ratchet Tool: Rotate/Move the Tensioner Pulley/Arm "away" from Belt contact area on the Tensioner. This spring is pretty hard and with a new belt, it will be even harder to install. Rotate/Move this to as-close to the maximum allowed inorder to have enough slack in the belt to get it up and over the last pulley.
d. Using your other hand - Pull the Belt up and over the Last remaining Pulley.
e. Before releasing the pressure on the Tensioner, visually inspect the remainder Pulleys and the Belts' Positioning on them.
3helpful
1answer

How to replace serpentine belt on 2000 saturn L series not ion

Click on the following direct Link. It has the Serpentine Belt Diagram for the L-Series for your specific engine and options (AC/No AC etc.). It has other additonal diagrams for your future use. It also has diagrams on how to rotate/move the Tensioner Pulley/Arm to loosen and remove the Belt.

Standard Rules to Removal the Serpentine Belt:
1. Find the Tensioner(s). (See Diagrams on Link)
2. Using a Serpentine Belt Tensioner Tool, Or Wrench OR Ratchet, Rotate/Move the Tensioner USING THE AVAILABLE NUT OR OPENING (3/8ths or 1/2 inch square opening) rotating it\moving it away from contact with the belt and towards the area where the belt is not in contact with the Tensioner Pulley. The Tensioner is spring loaded, and is hard to rotate/move.
3. Remove the loosened belt off one of the other more easily accessed Pulleys.

Standard Rules for Installing the Serpentine Belt:
a. Pick a Pulley that is most easily accessed. This will usually be on top. This will be the last Pulley that the belt will go on.

b. Using the Diagram: Install the new Serpentine Belt on the remainder of the Pulleys....over, under, left right.
c. Using a Serpentine Belt Tensioner Tool or Wrench or Ratchet Tool: Rotate/Move the Tensioner Pulley/Arm "away" from Belt contact area on the Tensioner. This spring is pretty hard and with a new belt, it will be even harder to install. Rotate/Move this to as-close to the maximum allowed inorder to have enough slack in the belt to get it up and over the last pulley.
d. Using your other hand - Pull the Belt up and over the Last remaining Pulley.
e. Before releasing the pressure on the Tensioner, visually inspect the remainder Pulleys and the Belts' Positioning on them.


Let me know if this helped, or if you have additional information or questions. Feel Free to contact me at FixYa.com!

http://www.2carpros.com/car_repair_information/year/2000/make/saturn/model/ls/2000_saturn_ls_drive_belt_routing_diagram.htm
0helpful
1answer

The crankshaft turns but won't turn the serpentine belt after radiator fluid got on it!

Remove and Replace the Serpentine Belt.
Click on the following free direct Link. It has the Serpentine Belt Diagram and Tensioner location for your 3.0L V6 including the DOHC engine.
http://www.2carpros.com/car_repair_information/year/2000/make/ford/model/taurus/2000_ford_taurus_drive_belt_routing_diagram.htm
GENERAL/Standard Rules to Removal the Serpentine Belt with a Tensioner:
A. Find the Tensioner(s). (See Diagrams on Link)
B. Using a Serpentine Belt Tensioner Tool, Or Wrench OR Ratchet, Rotate/Move the Tensioner USING THE AVAILABLE NUT (on the Pulley or Arm Base) OR the OPENING (3/8ths or 1/2 inch square opening) rotating the Tensioner Pulley/Arm - moving it away from contact with the belt and towards the area where the belt is not in contact with the Tensioner Pulley. The Tensioner is spring loaded, and is hard to rotate/move.
C. Remove the loosened belt off one of the other more easily accessed Pulleys.
D. DO NOT quickly release the Tensioner, but gently allow the Tensioner to rest in its closed position.

Standard Rules for Installing the Serpentine Belt with Tensioners:
a. Pick a Pulley that is most easily accessed. This will usually be on top. This will be the last Pulley that the belt will go on.
b. Using the Diagram: Install the new Serpentine Belt on the remainder of the Pulleys....over, under, left right.
c. Using a Serpentine Belt Tensioner Tool or Wrench or Ratchet Tool: Rotate/Move the Tensioner Pulley/Arm "away" from Belt contact area on the Tensioner. This spring is pretty hard and with a new belt, it will be even harder to install. Rotate/Move this to as-close to the maximum allowed inorder to have enough slack in the belt to get it up and over the last pulley.
d. Using your other hand - Pull the Belt up and over the Last remaining Pulley.
e. Before releasing the pressure on the Tensioner, visually inspect the remainder Pulleys and the Belts' Positioning on them

Let me know if this helped, or if you have additional information or questions. Feel Free to contact me at FixYa.Com!

0helpful
1answer

Putting on drive belt on a focus

My sincere apologies for the delayed response.
I am personally going back to answer your unanswered questions.
I have only been a free contributor to this site for the past 4-months.

I do not know if you still need this information, but I am going ahead and answering it anyway.

CLICK
on the following LINK. It has several Belt Diagrams, one which will match your specific engine and options (AC/No AC, Power Steering, .etc) that you will need.

Regarding HOW:
Standard Rule to Removal the Serpentine Belt:
1. Find the Tensioner(s). (See the Diagrams on Link)
2. Using a Serpentine Belt Tensioner Tool or Wrench or Ratchet Tool: Rotate/Move the Tensioner Pulley/Arm away from contact with the belt and towards the area where the belt is not in contact with the Tensioner Pulley. The Tensioner is spring loaded, and is hard to rotate/move.
3. Remove the loosened belt off one of the other more easily accessed Pulleys
.
Standard Rules for Installing the Serpentine Belt:
a. Pick a Pulley that is most easily accessed. This will usually be on top. This will be the last Pulley that the belt will go on.

b. Using the Diagram: Install the new Serpentine Belt on the remainder of the Pulleys....over, under, left right etc.
c. Using a Serpentine Belt Tensioner Tool or Wrench or Ratchet Tool: Rotate/Move the Tensioner Pulley/Arm "away" from Belt contact area on the Tensioner. This spring is pretty hard and with a new belt, it will be even harder to install. Rotate/Move this to as-close to the maximum ("open") allowed inorder to have enough slack in the belt to get it up and over the last pulley.
d. While keeping the Tensioner Pulley/Arm "open" Using your other hand - Pull the Belt up and over the Last remaining Pulley.
e. Before releasing the pressure on the Tensioner, visually inspect the remainder Pulleys and the Belts' Positioning on them.
Let me know if this helped...
Again my apologies..
http://www.2carpros.com/car_repair_information/year/2000/make/ford/model/focus/2000_ford_focus_drive_belt_routing_diagram.htm
9helpful
2answers

I need a diagram of the serpentine for a ford focus 2002 z3

Hi

Thanks for using FixYa. You can look at this picture for serpentine belt for your 2002 Ford Focus Z3--

3103caa.jpg

Ford Focus Z3 Serpentine belt Removal--

· Jack up the front of the vehicle and support it on jack stands. Use a wrench to remove two bolts and take off the drive belt lower cover.
· Note belt routing and make a sketch for your reference if you don't have a belt routing diagram from the manufacturer.
· Find the belt tensioner pulley. Use your wrench to rotate the tensioner pulley by pulling clockwise on a bolt in the center of the pulley. Slip the old belt off of the tensioner pulley.
· Release the belt tensioner. Slip the belt off of the pulleys and install the new belt according to your routing diagram.
· Rotate the tensioner again to allow the new belt to slip over the tensioner pulley. Release the tensioner again. Replace the drive belt lower cover and lower the vehicle.

Please do rate the solution and revert for further assistance.

Thanks
Rylee
Not finding what you are looking for?

4,441 views

Ask a Question

Usually answered in minutes!

Top Ford Experts

ZJ Limited
ZJ Limited

Level 3 Expert

17989 Answers

Ronny Bennett Sr.
Ronny Bennett Sr.

Level 3 Expert

6988 Answers

Thomas Perkins
Thomas Perkins

Level 3 Expert

15088 Answers

Are you a Ford Expert? Answer questions, earn points and help others

Answer questions

Manuals & User Guides

Loading...