Cars & Trucks Logo

Related Topics:

Charles Johnson Posted on Apr 12, 2015
Answered by a Fixya Expert

Trustworthy Expert Solutions

At Fixya.com, our trusted experts are meticulously vetted and possess extensive experience in their respective fields. Backed by a community of knowledgeable professionals, our platform ensures that the solutions provided are thoroughly researched and validated.

View Our Top Experts

I have an 01bmw 525i trying to remove manifold,I've removed all top screws and disconnected all wires but manifold seems bolted underneath will shake but not come up source is not located Please help!

2 Answers

paulmacintyre

Level 3:

An expert who has achieved level 3 by getting 1000 points

Superstar:

An expert that got 20 achievements.

All-Star:

An expert that got 10 achievements.

MVP:

An expert that got 5 achievements.

  • BMW Master 3,218 Answers
  • Posted on Apr 12, 2015
paulmacintyre
BMW Master
Level 3:

An expert who has achieved level 3 by getting 1000 points

Superstar:

An expert that got 20 achievements.

All-Star:

An expert that got 10 achievements.

MVP:

An expert that got 5 achievements.

Joined: Apr 04, 2015
Answers
3218
Questions
0
Helped
968130
Points
11418

The manifold will be bolted to the front exhaust pipe as well. If all bolts are out of manifold, you need to be under car and disconnect front exhaust pipe to manifold bolts

  • Charles Johnson
    Charles Johnson Apr 12, 2015

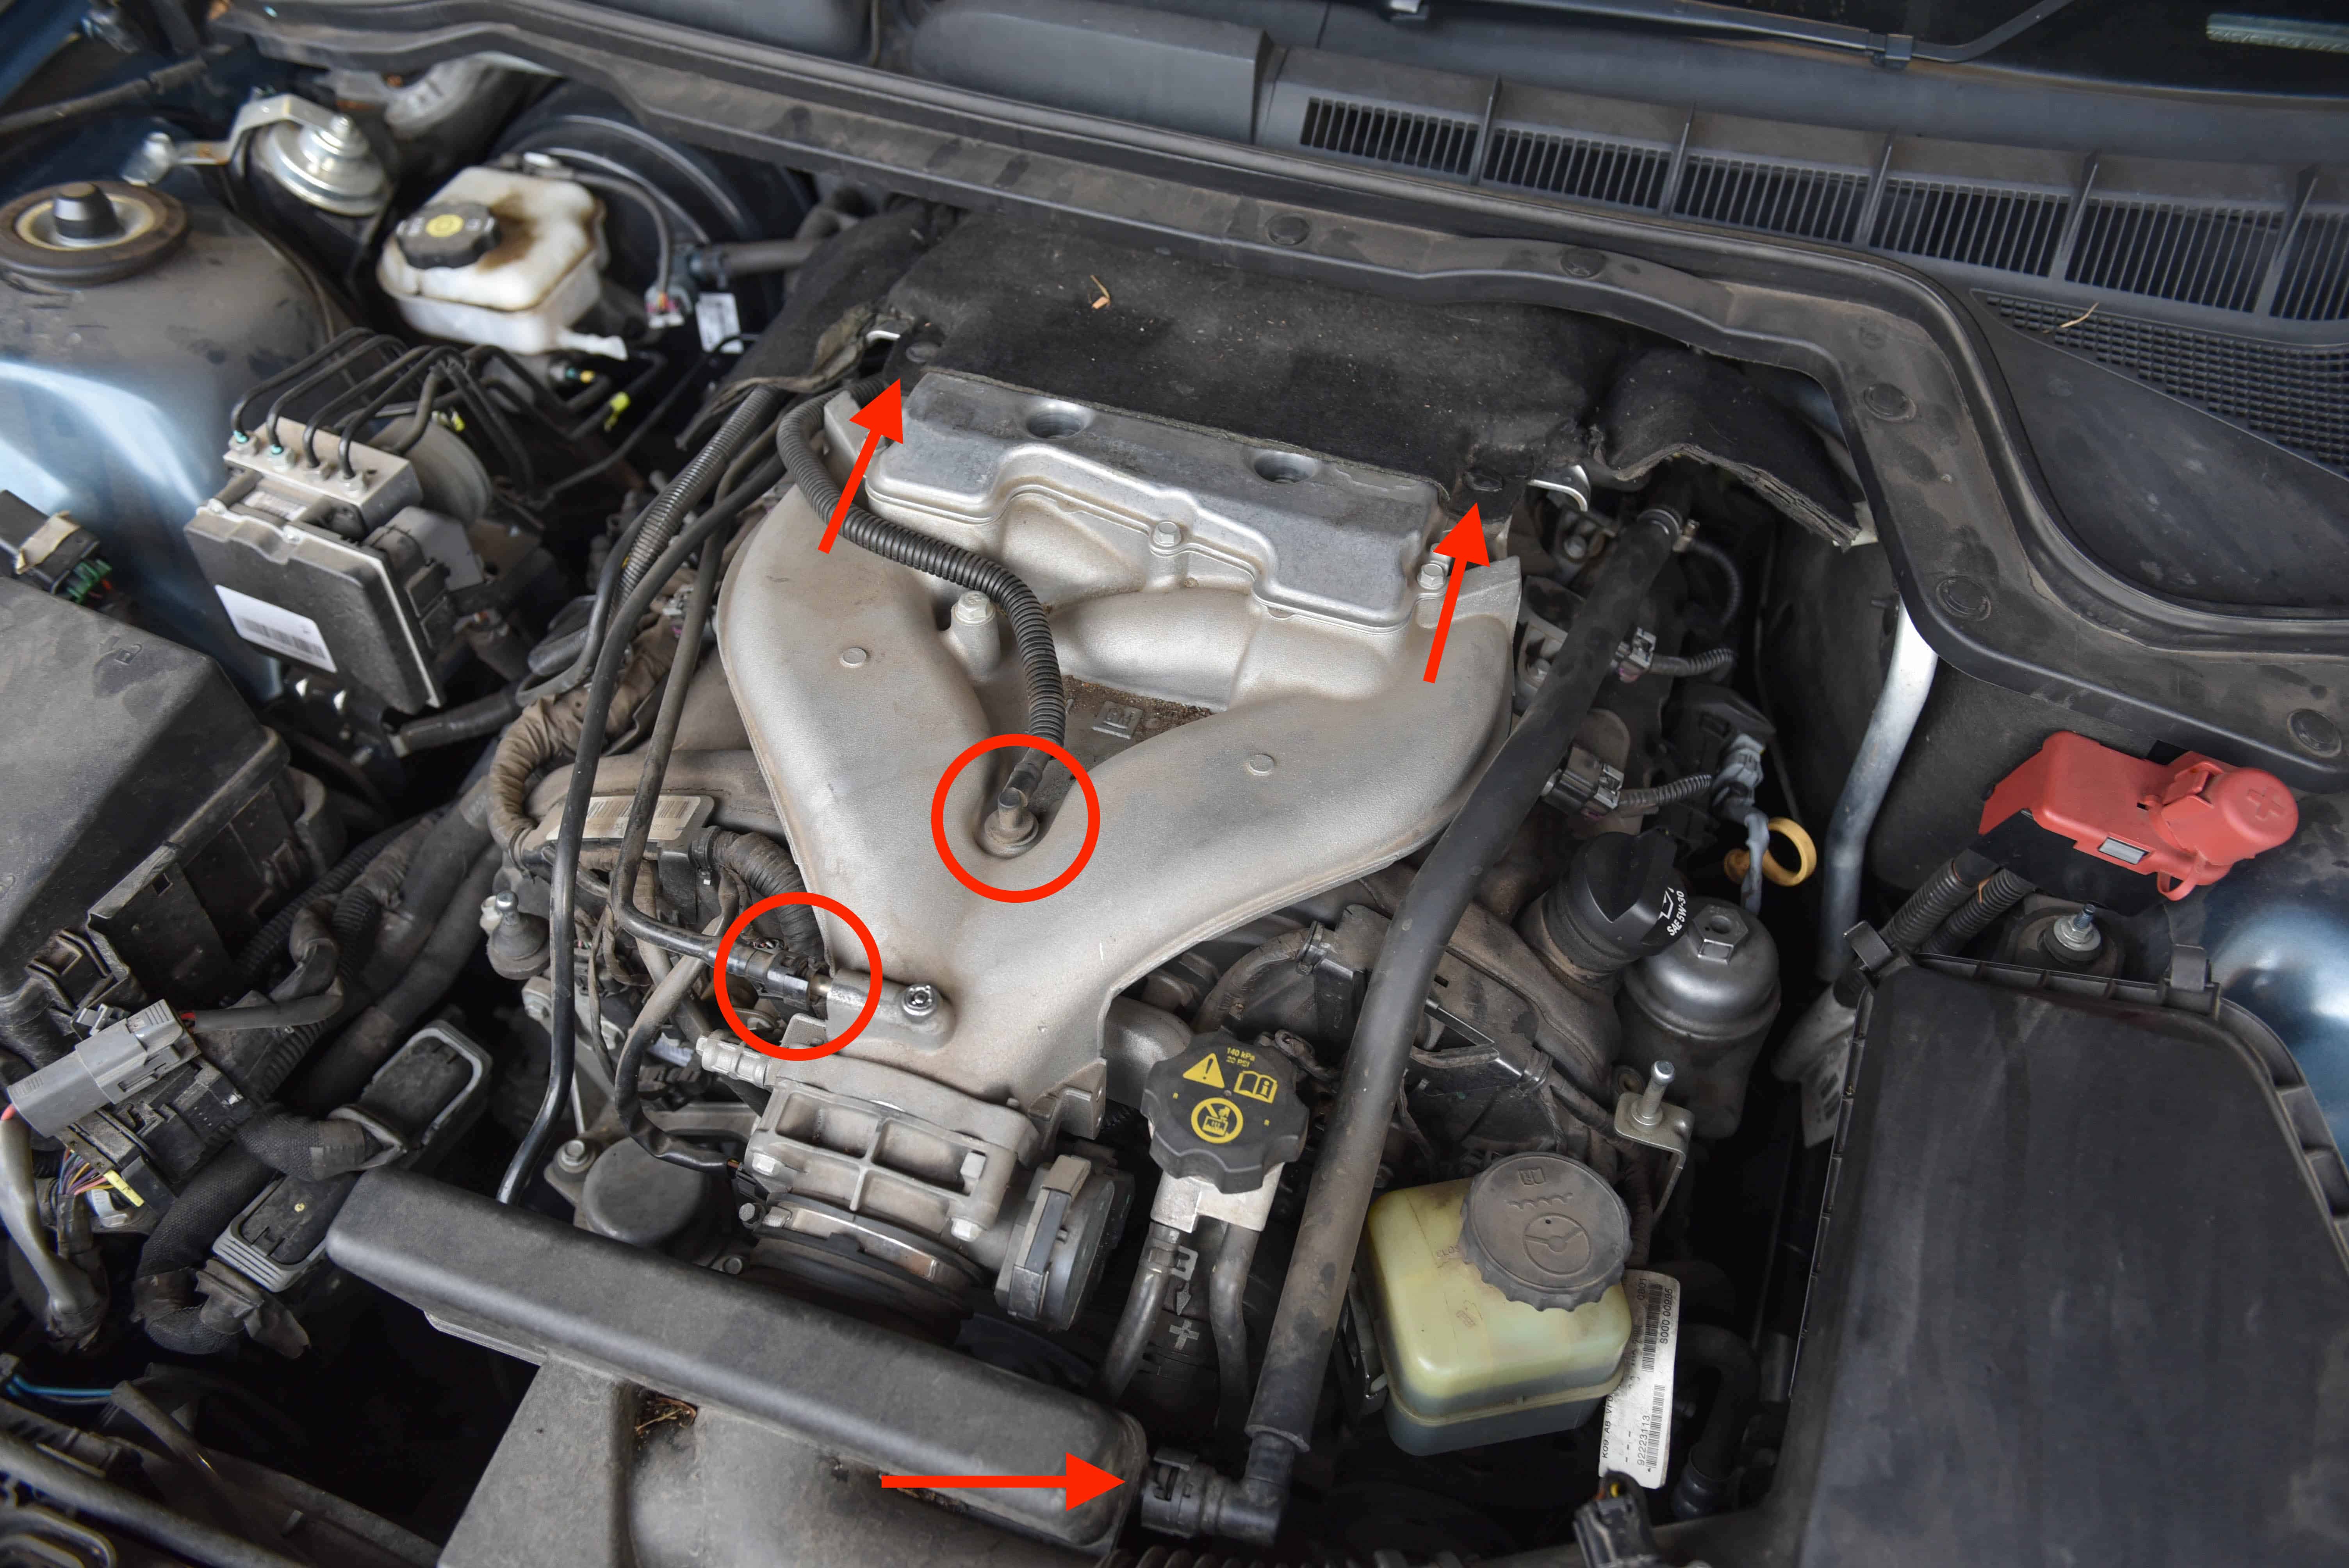
    Thanks, is this the way to remove the intake manifold on side of motor?

  • paulmacintyre
    paulmacintyre Apr 12, 2015

    No intake manifold is attached to the cylinder head only and may have a support bracket under it attached to the engine block and intake manifold

×

Pierre Laplante

Level 3:

An expert who has achieved level 3 by getting 1000 points

Superstar:

An expert that got 20 achievements.

All-Star:

An expert that got 10 achievements.

MVP:

An expert that got 5 achievements.

  • BMW Master 2,061 Answers
  • Posted on Apr 12, 2015
Pierre Laplante
BMW Master
Level 3:

An expert who has achieved level 3 by getting 1000 points

Superstar:

An expert that got 20 achievements.

All-Star:

An expert that got 10 achievements.

MVP:

An expert that got 5 achievements.

Joined: Jan 02, 2008
Answers
2061
Questions
3
Helped
789262
Points
21147
Ad

5 Related Answers

jennifer godlewski

  • 52 Answers
  • Posted on Jan 05, 2009

SOURCE: Can't remove intake manifold on 94 Chevy 5.7L TBI

Yes, the allen bolts need to come out.

Ad
co7196

Ned C Cook

  • 3433 Answers
  • Posted on May 19, 2009

SOURCE: Broken manifold bolts / manifold removal

Whatever it takes, but make sure you soak some penetrating oil oi wd40 on others to avoid any more being broken. Pulling the manifold is the safest and quickest way. With it out of the way, you'll have someting on the broken bots, now studs to work with. Always drill a broken stud or bolt clean through. Penetrating oil can work from both ends and a broken easy out can be driven in far enough to work arounf -Good Luck, force nothing, Tap stud and apply only stesdy even presure when extracting.

Remontti-J

Remontti-J

  • 32 Answers
  • Posted on May 31, 2009

SOURCE: Need to remove Intake Manifold on 2002 PT Cruiser

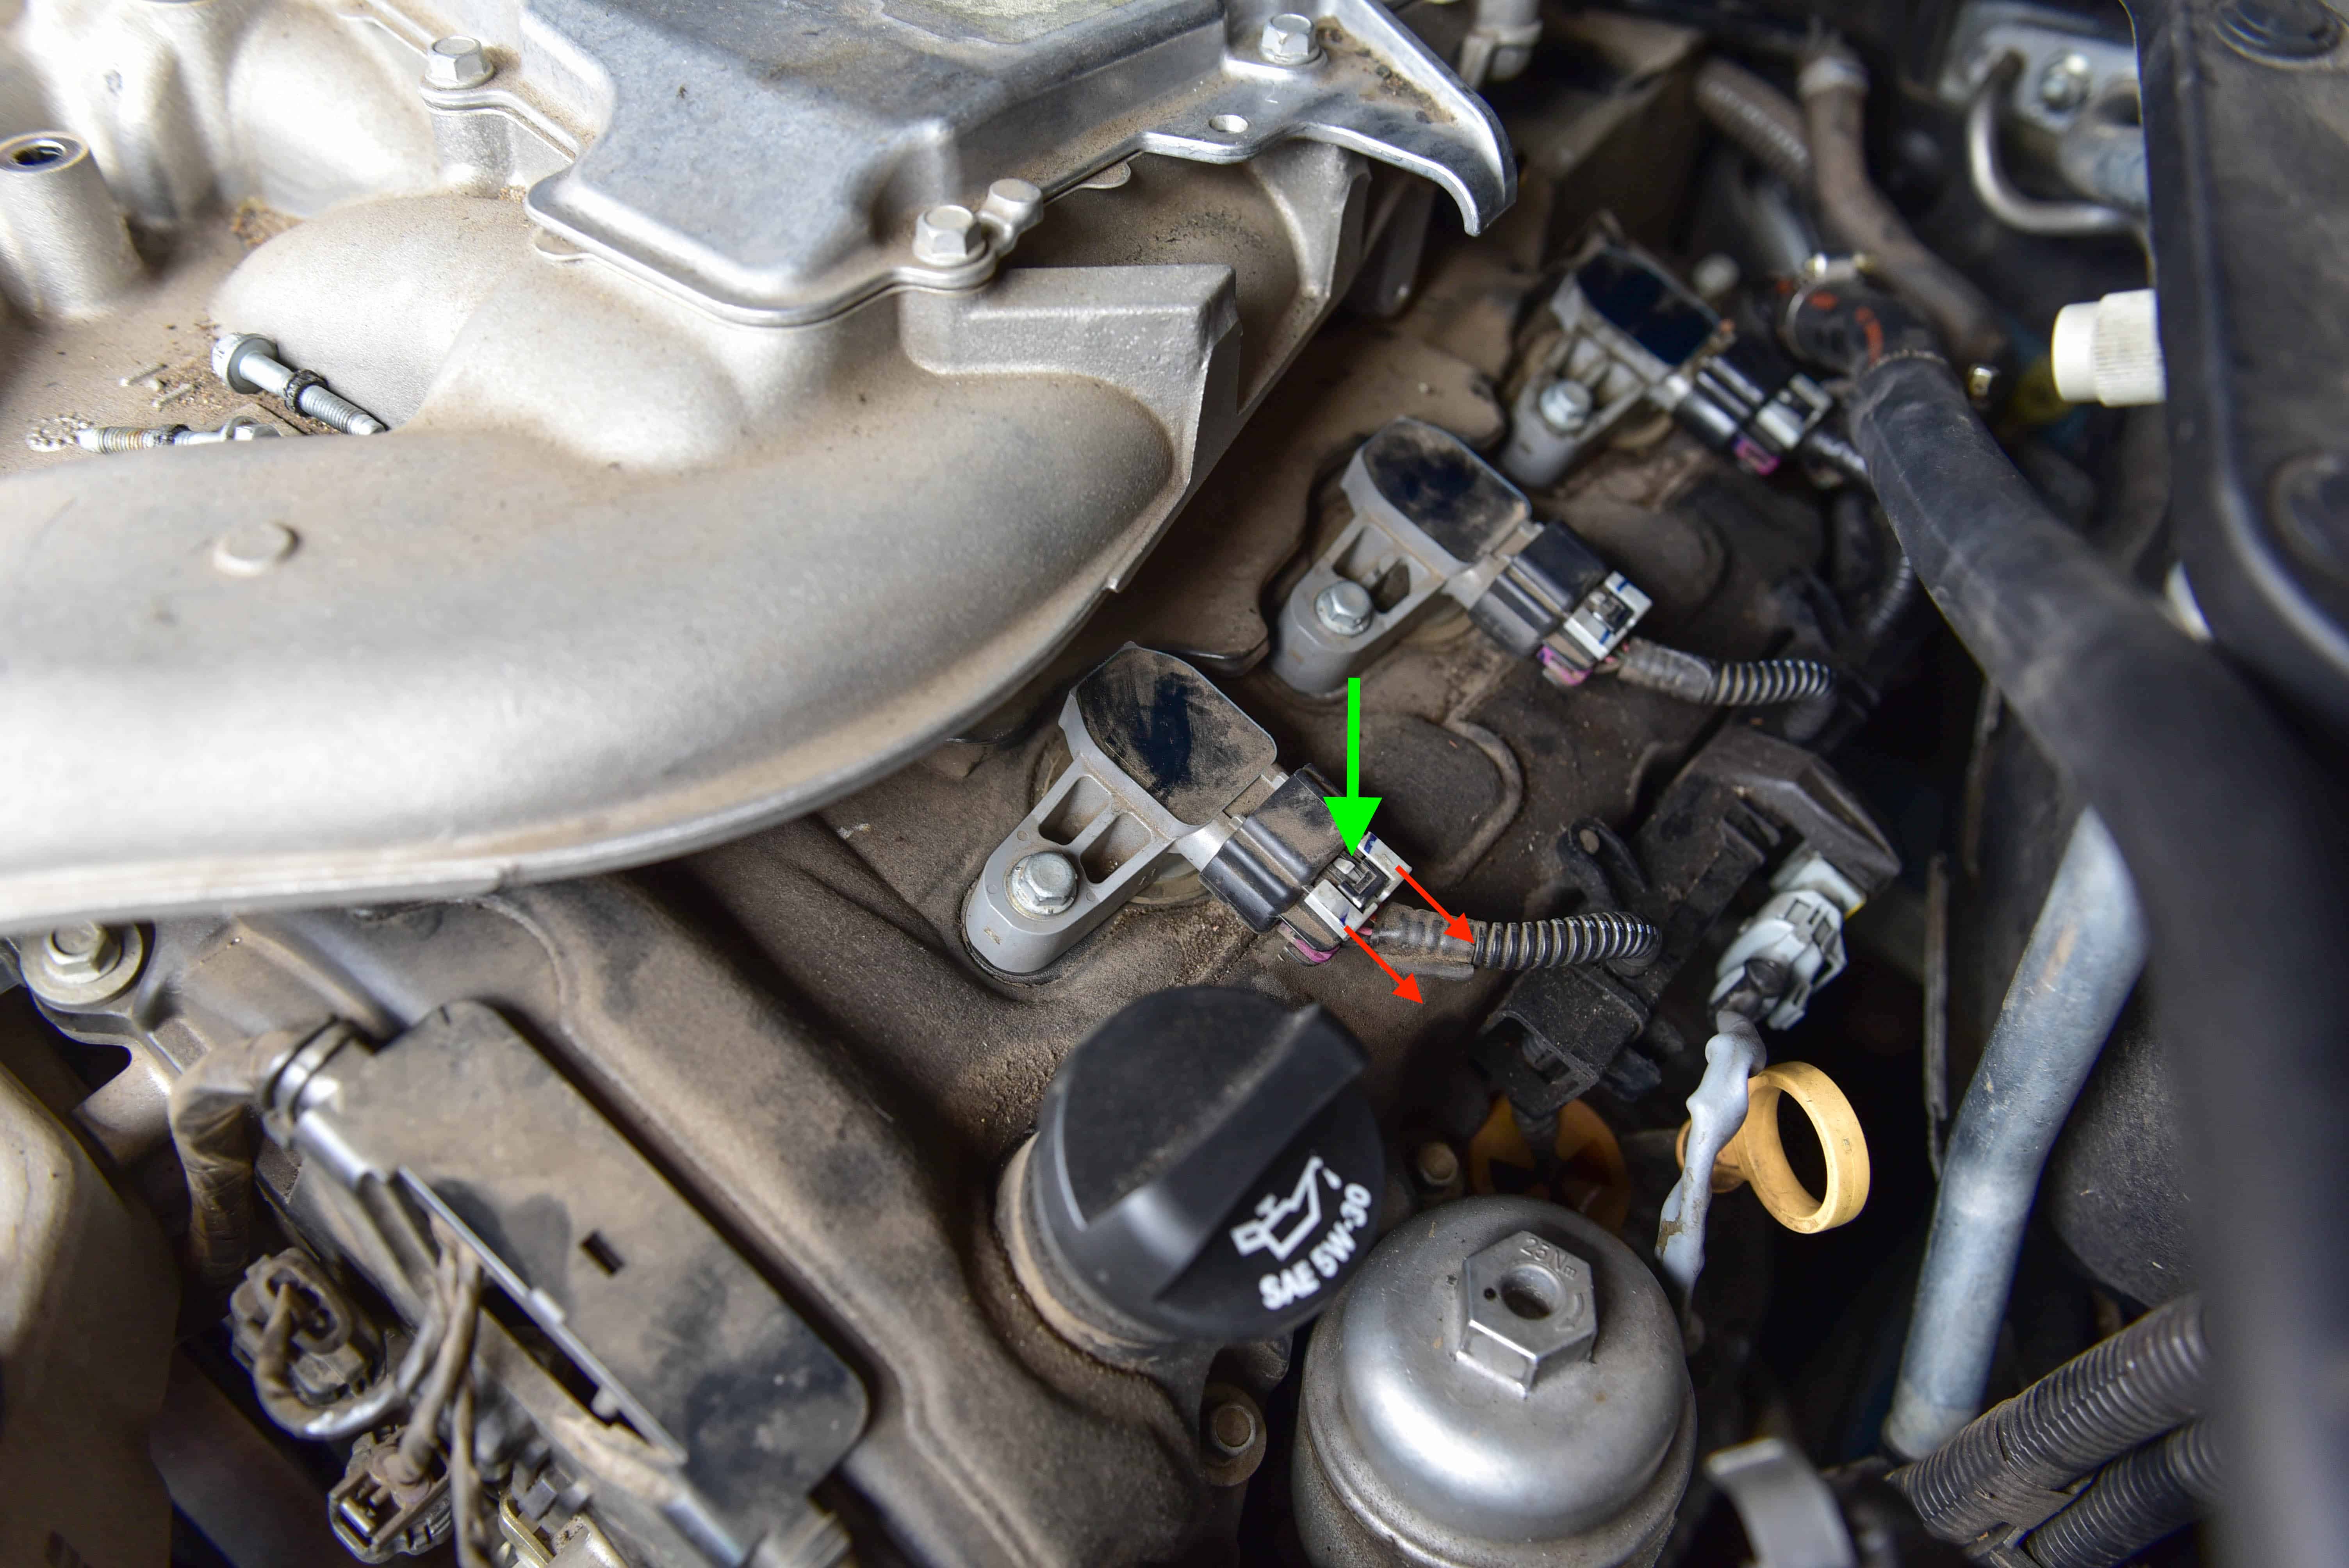
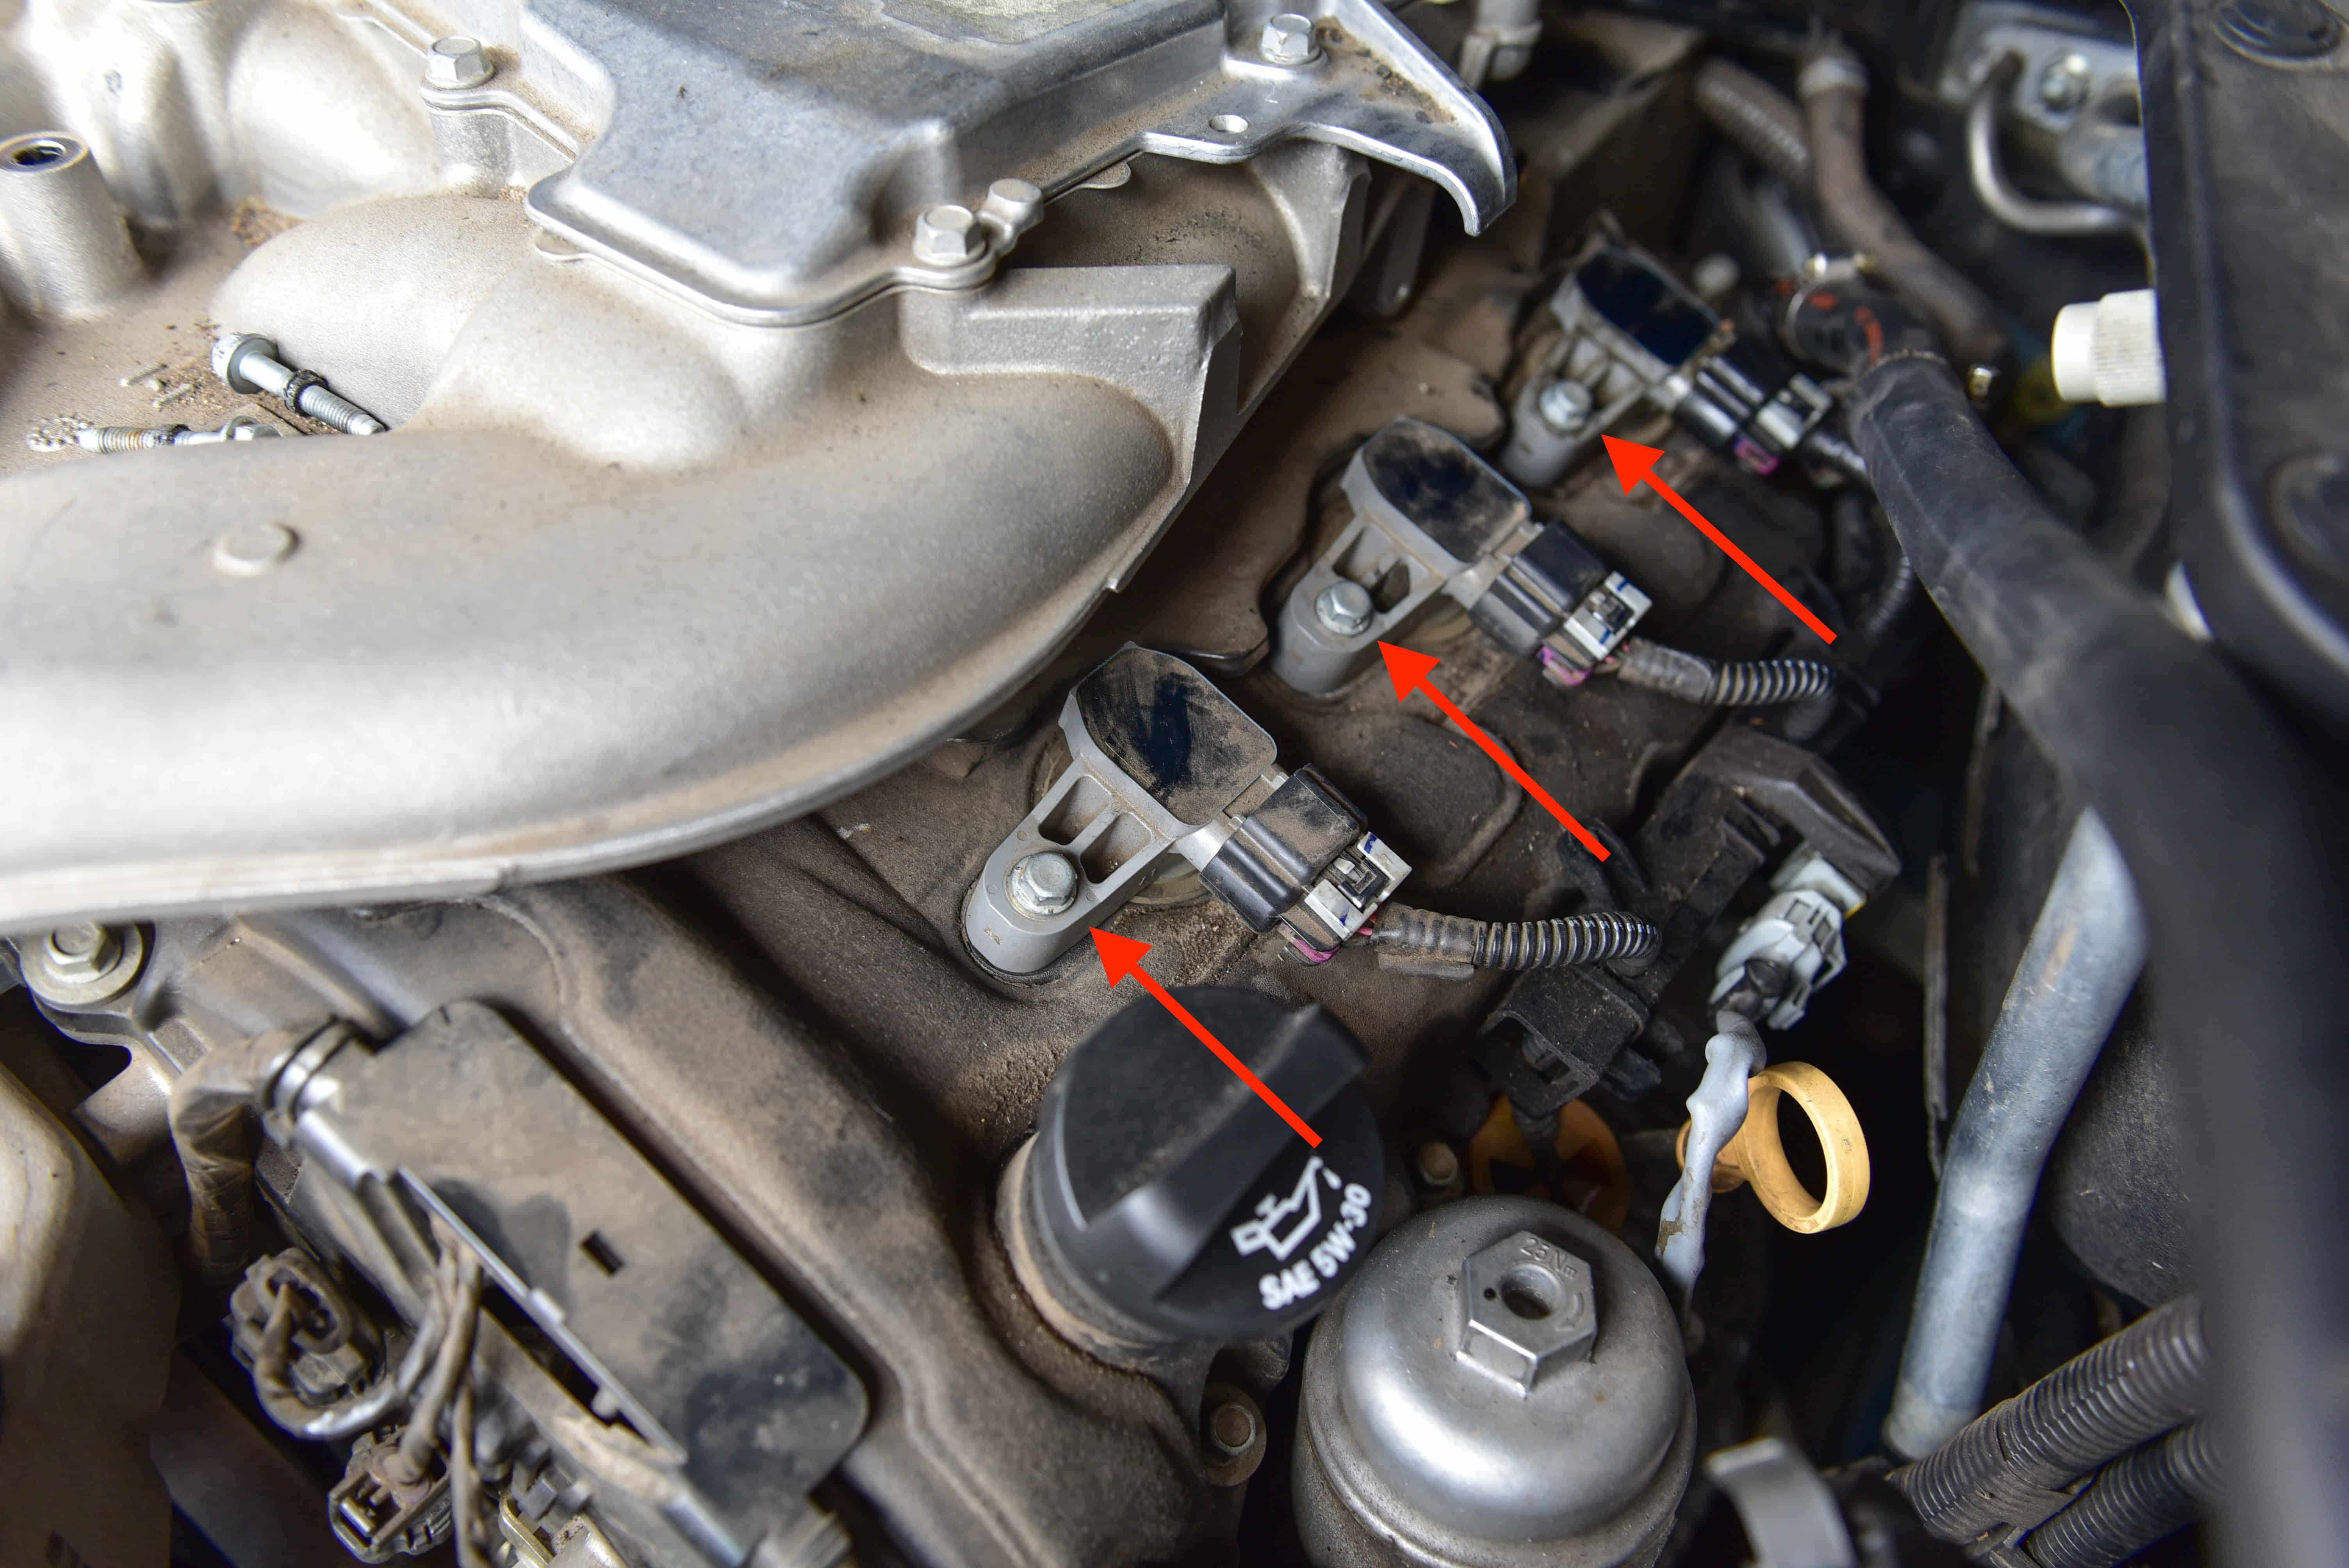
Here are my photos what you need to open when replace plugs&wires:

http://www.ptcruiser.fi/ptgalleria/albums/userpics/10010/normal_tulppa1.jpg

http://www.ptcruiser.fi/ptgalleria/albums/userpics/10010/tulppa2.jpg

http://www.ptcruiser.fi/ptgalleria/albums/userpics/10010/tulppa3.jpg

Fixitman909

Tommy Thomas

  • 430 Answers
  • Posted on Jul 24, 2009

SOURCE: removing starter on 1998 Mitsubishi Diamante

tap it a few timnes with a hammer.....it should loosen up then u decide .................. gl

Randy Ohler

  • 14585 Answers
  • Posted on Feb 28, 2011

SOURCE: I'm trying to remove my oil pan on a 2000

I am not sure, But there could be six more bolts to remove. They will be on the side of the pan, about half way up. three on each side. Sorry for guessing, I work on to many makes and models. Also the gaskets do hold the pan on tight sometimes. If there are no extra bolts then carefully pry it off.

Ad

Add Your Answer

×

Uploading: 0%

my-video-file.mp4

Complete. Click "Add" to insert your video. Add

×

Loading...
Loading...

Related Questions:

1helpful
2answers

Need to replace valve cover gasket on 01 pt cruiser

This procedure takes approx 3 hours.You have to remove upper intake manifold and cylinder head cover,in order to replace valve cover gasket.
Its a huge procedure,but can be done easily.

Click the link below and follow step by step details.

http://technoanswers.blogspot.in/2012/06/valve-cover-gasket-removal-guide.html

---------
This will help.
Thanks.
0helpful
1answer

Diagram for changing spark plugs on ve sv6 ute

Step 1
To access all six spark plugs, we need to loosen the intake manifold. This will require removal of attached components.
  • Unclip and remove the black insulating material
  • Disconnect the three PCV tubes. Push the tab across and pull outwards
Step 2
Unclip the purge solenoid from the intake manifold. It slides off towards the firewall.
Step 3
Unclip the throttle body loom and disconnect the intake pipe. Also unbolt the support bracket as circled.
Step 4
Remove the five long bolts located on top of the intake manifold. The bolt closest to the front is shorter than the rest. Keep this in mind when reinstalling.
Step 5
Next, remove the final bolt securing the manifold to the engine. You will need to unscrew this bolt entirely, however you will not be able to remove it from the manifold due to a lack of clearance.
(This picture has been borrowed from an LFX engine. The bolt however is identical)
Step 6
Raise the intake manifold and place an object underneath it to support it. This will provide enough clearance to access all the spark plugs.
Step 7
Unclip all looms from the ignition coils. Simply push the grey tab downwards, then press on the connector and disconnect.
Step 8
Unbolt the ignition coils and remove from the engine.
Step 9
Using a spark plug socket and breaker bar, gently remove the spark plugs from the engine.
Step 10
Install the new spark plugs by applying a light coating of anti-size and gently thread them into position by hand. Be very careful not to cross thread the plugs.
Tighten with a torque wrench to 20nm.
3helpful
1answer

How to replace a starter on a 1991 lexus ls 400

On Lexus ls 400 the starter is located underneath the manifold of intake. The intake manifold has to be removed to replace the starter.The intake manifold located on the top, left side of the engine from the front, along with the hoses, wires and tubes connected to the manifold.Mark each connections before disconnecting.This will help you while reconnecting.The starter is fitted by bolts.Remove the bolts and detach electrical cables on starter.Remove starter from engine compartment.Then re-fit the new starter in reverse as you removed the old starter.Its not very easy job.You will require proper tools to do this.This will help.Thanks.Helpmech.

2helpful
2answers

Cylinderhead torque stc.

Cylinder Head Removal & Installation SOHC To Remove:
  1. Relieve fuel system pressure.
  2. Remove timing belt cover. Camshaft timing marks kia-03-20-7032.gif

  3. Turn crankshaft until timing mark on front housing and the arrow "2" on the camshaft pulley align.
  4. Loosen lock bolt on tensioner.
  5. Pry tensioner away from timing belt and tighten lock bolt to relieve tension on the timing belt.
  6. Remove timing belt from camshaft pulley.
  7. Disconnect battery negative cable.
  8. Remove 3 bolts that secure accelerator cable and air intake hose to cylinder head cover.
  9. Detach accelerator cable and place off to side.
  10. Remove the following;
    • Air hose
    • Air ISC air hose
    • Breather hose
    • Vacuum hose from air intake hose
  11. Disconnect mass air flow sensor electrical connector.
  12. Remove air intake hose.
  13. Remove PCV valve from cylinder head cover.
  14. Remove ISC air hose from idle speed actuator.
  15. Remove air hose from behind intake manifold.
  16. Remove 2 screws from high tension wire protectors.
  17. Detach wire loom from holder at rear of cylinder head cover.
  18. Detach vacuum tube at rear of cylinder head cover.
  19. Remove vacuum pipe. Cylinder Head Cover kia-03-20-7042.gif

  20. Remove 7 cylinder head cover bolts.
  21. Remove cylinder head cover and gasket.
  22. Disconnect 2 ignition coil electrical connectors.
  23. Disconnect 2 fuel injection electrical connectors at rear of cylinder head.
  24. Disconnect the following electrical connectors;
    • Oxygen sensor
    • Throttle position sensor
    • Idle speed actuator
    • Oil pressure switch
    • EGR vacuum solenoid valve at intake manifold
  25. Disconnect heater hose from elbow.
  26. Disconnect brake booster vacuum hose and cruise control vacuum hose from surge tank.
  27. Detach wire harness from rear of cylinder head.
  28. Disconnect purge control solenoid vacuum hose from intake manifold.
  29. Disconnect fuel hose from fuel connector assembly.
  30. Remove grounding bracket.
  31. Remove 4 bolts and intake manifold bracket.
  32. Remove starter.
  33. Detach water bypass hose from bypass pipe.
  34. Disconnect water hoses from oil cooler.
  35. Disconnect fuel hose from fuel pipe.
  36. Remove exhaust manifold heat shield.
  37. Remove exhaust flange nuts and front exhaust bracket bolt.
  38. Lower exhaust system. Cylinder head bolt loosening sequence kia-03-20-7050.gif

  39. Loosen cylinder head bolts in 3 steps in proper sequence.
  40. Remove cylinder head bolts and washers.
  41. Remove cylinder head, intake manifold and exhaust manifold as an assembly.
To Install:
  1. Install NEW cylinder head gasket.
  2. Install cylinder head, intake manifold and exhaust manifold as an assembly.
  3. Tighten cylinder head bolts in 3 steps in reverse sequence that was used during removal. Tighten bolts to 62 ft lb (84 Nm).
  4. Install front exhaust bracket bolt. Tighten bolt to 20 ft lb (27 Nm).
  5. Install NEW lower exhaust flange gasket and 3 nuts. Tighten nuts to 24 ft lb (31 Nm).
  6. Install exhaust manifold heat shield. Tighten nuts to 35 in lb (4 Nm).
  7. Connect fuel hose to pipe.
  8. Connect 2 hoses to oil cooler.
  9. Attach water bypass hose to bypass pipe.
  10. Install starter and bolts. Tighten bolts to 34 ft lb (46 Nm).
  11. Install intake manifolds bracket and 4 bolts. Tighten bolts to 32 ft lb (45 Nm).
  12. Install grounding bracket.
  13. Connect fuel hose to fuel connector assembly.
  14. Connect the following electrical connectors;
    • Oxygen sensor
    • Throttle position sensor
    • Idle speed actuator
    • Oil pressure switch
    • EGR vacuum solenoid valve at intake manifold
  15. Connect purge control solenoid vacuum hose to intake manifold.
  16. Attach wire harness from rear of cylinder head.
  17. Connect brake booster vacuum hose and cruise control vacuum hose to surge tank.
  18. Connect heater hose to elbow.
  19. Connect 2 fuel injection electrical connectors at rear of cylinder head.
  20. Connect 2 ignition coil electrical connectors.
  21. Install cylinder head cover.
  22. Install 7 cylinder head cover bolts. Tighten bolts to 60 in lb (7 Nm).
  23. Install vacuum pipe and 2 bolts at rear of cylinder head cover. Tighten bolts to 60 in lb (7 Nm).
  24. Connect vacuum tube to pipe.
  25. Connect loom holder to rear of cylinder head cover.
  26. Install 2 screws to high tension wire protectors.
  27. Install air hose to behind intake manifold.
  28. Install ISC air hose to idle speed actuator.
  29. Install PCV valve to cylinder head cover.
  30. Install air intake hose.
  31. Connect mass air flow sensor electrical connector.
  32. Install the following;
    • Air hose
    • Air ISC air hose
    • Breather hose
    • Vacuum hose from air intake hose
  33. Attach accelerator cable.
  34. Install 3 bolts that secure accelerator cable and air intake hose to cylinder head cover. Timing belt pulley timing marks kia-03-20-7035.gif

    NOTE: Timing belt pulley timing mark and timing mark must be aligned.
    Camshaft timing marks kia-03-20-7032.gif

    NOTE: The arrow at "2" on camshaft pulley must be aligned with timing mark on front housing.
  35. Install timing belt.
  36. Install timing belt cover.
  37. Pressurize fuel system.
  38. Start engine and check ignition timing.
1helpful
1answer

How to locate starter motor in mazda 323F

The starter motor is located on the back side of the engine (closest to the firewall) underneath the fuel injection/intake manifold. To replace it, first disconnect the battery, then remove the main power cable (heavy wire) and the start wire (light wire). Next remove the two bolts for the intake manifold support bracket and remove bracket. Remove one bolt on starter rear support bracket and 3 bellhousing flange bolts (two accessible from starter side, on accessible from bellhousing side). the starter is now free and can be taken out form teh passenger's side (LHD).
0helpful
1answer

Where it is and how to remove a starter motor on a mazda 323 1988 model

This is for a Mazda 323F The starter motor is located on the back side of the engine (closest to the firewall) underneath the fuel injection/intake manifold. To replace it, first disconnect the battery, then remove the main power cable (heavy wire) and the start wire (light wire). Next remove the two bolts for the intake manifold support bracket and remove bracket. Remove one bolt on starter rear support bracket and 3 bellhousing flange bolts (two accessible from starter side, on accessible from bellhousing side). the starter is now free and can be taken out form teh passenger's side (LHD).
0helpful
1answer

How to remove and repair a starter motor on a mazda 323 1988 model

The starter motor is located on the back side of the engine (closest to the firewall) underneath the fuel injection/intake manifold. To replace it, first disconnect the battery, then remove the main power cable (heavy wire) and the start wire (light wire). Next remove the two bolts for the intake manifold support bracket and remove bracket. Remove one bolt on starter rear support bracket and 3 bellhousing flange bolts (two accessible from starter side, on accessible from bellhousing side). the starter is now free and can be taken out form teh passenger's side (LHD).

Don't bother repairing it...I would call up a local wrecker and get a swap over...shouldn't cost you more than $30 - $50
2helpful
1answer

How do I replace the knock sensor? It seems to be underneath the intake manifold. I'm handy but not truly a mechanic, and I would be loathe to try something like this without some sort of detailed...

well i am a saturn tech,,i would disconnect the battery and remo the starter from underneath the car,,,2 15mm bolts hold it onto the engine,,,disconnect the 2 wires to the starter frist, then after removing the starter then knock sensor is right there 1 13mm bolt and there you go
16helpful
1answer

BMW 328i Starter how to replaice

1999 BMW 328I 2.8L EFI DOHC 6cyl

Starter - Removal & Installation

The starter motor on some models is very difficult to see from the top of engine compartment as it is covered by the intake manifold. On these models, without removing the intake manifold, the starter motor must be removed from underneath the vehicle. Because the starter motor mounting bolts are not easy to access, a long extension with a universal joint mounted on a proper sized socket could be used. A three foot transmission extension is commercially available from tool vendors that has a 3 / 8 inch drive of the driven end and 1 / 2 inch drive on the drive end. If used with a non-binding impact universal joint and a proper fitting impact socket, the starter motor fasteners can be removed from underneath the vehicle.
Once the starter motor fasteners are removed, the starter motor may have to be moved side-to-side several times to loosen the dowel pin if it has corroded in place.

NOTE When the battery is disconnected, the radio code, on-board computer and clock settings will be lost. The radio code should be obtained before disconnecting the battery or radio. Once the battery has been reconnected, the radio will not function unless the code is keyed in.
Starter motor electrical terminal fastener torque specifications for all models:
M5 terminal fasteners: 44 inch lbs. (5 Nm)
M6 terminal fasteners: 53 inch lbs. (6 Nm)
M8 terminal fasteners: 115 inch lbs. (13 Nm)
Starter motor mounting fasteners:
Hex head bolts: 36 ft. lbs. (49 Nm)
Torx bolts: 32 ft. lbs. (43 Nm) Starter motor electrical terminal fastener torque specifications for all models:
M5 terminal fasteners: 44 inch lbs. (5 Nm)
M6 terminal fasteners: 53 inch lbs. (6 Nm)
M8 terminal fasteners: 115 inch lbs. (13 Nm) Starter motor mounting fasteners:
Hex head bolts: 36 ft. lbs. (49 Nm)
Torx bolts: 32 ft. lbs. (43 Nm) E36 6-Cylinder Engines
Automatic Transmission Models
  1. Before servicing the vehicle, refer to the Precautions section.
  2. Set the ignition switch to the OFF position.
  3. Disconnect the negative battery cable.
  4. Remove the climate control air intake duct at the rear of the engine compartment as follows:
    1. Release the grille clips at the rear and lift the grille upward from the rubber seal, then remove the seal.
    2. Remove the two self tapping Phillips screws from inside the duct to release the electrical harness housing.
    3. Press the electrical housing downward to expose and remove the two hex head self tapping screws on each side of the duct and lift the duct up and out of the engine compartment.
  5. Remove the intake manifold trim and valve cover trim covers.
  6. Disconnect the ignition coil electrical connectors and ground straps, label for reinstallation and place aside.
  7. Remove the two fasteners that secure the fuel injection electrical connector harness to the rail. Remove the harness and carefully place aside toward the back of the engine compartment behind the right side strut tower.
  8. Remove the intake manifold.
  9. Remove the electrical leads from the starter motor and place aside.
  10. Remove the starter motor mounting fasteners at the transmission bell housing, then remove the two mounting nuts at the L-shaped mounting bracket.
  11. Loosen the L-shaped bracket to engine block mounting bolt slightly, then remove the bolt while supporting the starter motor.
  12. Remove the bracket, then lift the starter motor upward away from the engine.
  13. Visually inspect the starter pinion and ring gears for any signs of damage.
  14. Installation is in reverse order of removal.
Manual Transmission Models
  1. Before servicing the vehicle, refer to the Precautions section.
  2. Set the ignition switch to the OFF position.
  3. Disconnect the negative battery cable.
  4. Raise and safely support the vehicle.
  5. Remove the fasteners for the reinforcement mounted between the frame rails just behind the rear lower control arm bushing brackets. Mark the bar-s direction for proper reinstallation and remove the bar.
  6. Remove the fuel line cover located near the left side rear lower control arm bushing bracket.
  7. Release the fuel lines and reverse light wiring from their routing brackets.
  8. Note the routing of the starter motor electrical wires, remove the wire mounting nuts, and place the wires aside.
  9. Remove the top and bottom starter motor to engine-transmission mounting fasteners.
  10. Remove the two mounting nuts at the L-shaped mounting bracket.
  11. Loosen the L-shaped bracket to engine block mounting bolt slightly, then remove the bolt while supporting the starter motor.
  12. Remove the bracket and carefully lower the starter motor downward away from the engine.
  13. Visually inspect the starter pinion and ring gears for any signs of damage.
  14. Installation is in reverse order of removal.

Fig. A view of the starter motor mounting fasteners and dowel pin. The mounting bolts are threaded into the starter motor

cd45991.jpg

Fig. The starter motor mounting bolts are a different size than the transmission-to-engine mounting bolts

2cbfa11.jpg

I hope help you with this (rated this help) Good luck.
37helpful
1answer

Sparkplugs are due for replacement mazda tribute v6

Get all your tools ready and a few styrofoam cups to keep the bolts organized and labeled for re-assembly. Have a pencil and tablet handy for notes while doing the take-down. Forgive me if I can't name all the parts. I'm not a mechanic but I was able to successfully replace all six plugs. The key is to keep track of each part you pull & replace it in the reverse order. Number the cups with a marker 1,2,3,4,5.

You'll need a metric socket set,
a spark plug socket and a deep 8mm socket
A flat/slot bladed screw driver will also be handy.
A roll of tape to use as labels

In short, here are the abbreviated steps:
Disconnect the battery
Remove the engine cowling
Disconnect the throttle cable(s)
Remove the ribbed air intake hose
Disconnect the two black wire sockets on the throttle intake
Disconnect the two wire sockets at the top-left of the engine
Disconnect the three hoses in the back/center
Disconnect the solid pipe (saucer on top) on the right side of the manifold
Disconnect the instrument which is behind the solid pipe/saucer
Disconnect one hose from just in front of the master cylinder (brake fluid reservoir)
Remove four long screws at the corners of the manifold
Loosen eight screws keeping the manifold in place (these are captive)
Remove the manifold
Remove each screw holding the spark plug caps in place
Remove each of the spark plug caps
Remove and replace each of the spark plugs

~~~~~~~~~~~~~~~~~~~~~~~~~~
Now the more descriptive version:
Disconnect the positive terminal on the battery and set it off to the side. This is primarily for safety reasons.

Remove the three nuts from the cowling, pull it and set it aside with the three nuts in cup#1. You'll see the three forward spark plug caps now but WAIT until you have the back three also viewable.

Find the throttle cable(s) on the top and the throttle itself with a circular spring. Rotate it counter-clockwise to slacken the cable and disconnect it, and the secondary line/cable it is attached to. I don't know what the heck it is but it's plastic so be careful not to snap it. Remove the three screws keeping the throttle cables attached to the manifold and keep them in cup#2. There is one short gold colored screw on the left bracket and two longer silver colored screws on the right bracket. Flip the throttle cable up and to the left to get it out of the way.

Next, pull the ribbed air intake hose by loosening both the screw clamps and pop-out the sensor line on the top of the hose
Pull the larger end down and rotate it toward you to remove. Again, set it safely aside.

Since the ribbed hose is near the throttle body, go ahead and disconnect the two wire sockets from the throttle body. They'll be immediately to the left of where the ribbed intake hose attaches. These are easy to access when the intake hose is off but tricky while it's still installed.

Disconnect the two wire plug sockets (one black, one gray) at the top-left of the manifold. Once the sockets are separated, use the flat screw driver to pry/nudge the plastic retainers from the holes keeping the sockets attached to the manifold. Otherwise they'll snag when pulling the manifold.

Disconnect the three hoses on the rear-center of the manifold and label these with a piece of tape as L-C-R. One each for Left, Center, Right.

Disconnect the solid pipe (looks like a saucer on top) on the right side of the manifold by removing the two bolts keeping it's bracket in place. Keep the bolts in cup#3. The Pipe will pull slightly away from the manifold but you will NOT be able to completely pull it out. It will stay in place and you'll eventually see the total length after the manifold comes off. There is also a small gasket around the pipe; leave it in place and tape it down for safekeeping while you're working. Remove the tape when you're reassembling.

Disconnect the instrument behind the solid pipe. (Sorry, I don't know what it's called) First remove the front bracket bolt and put it in cup#4. The rear bolt is a combination set and is a little tricky. Remove the outward nut first and again use cup#4. Next use a deep metric socket to remove the remainder of the bolt and use cup#4. Basically this is a bolt with a permanent nut in the middle and uses a second nut on the end to retain two different parts. You'll see what I mean. This keeps 3 pieces in cup#4 but they all go to the same place.

Next, look to the top-right of the engine and find the master cylinder. (This is where you would add brake fluid if needed). You'll see a hose running from just in front of this area (NOT on the master cylinder itself) down to the manifold with a plastic clip on top keeping it attached. Depress the clip and disconnect the hose.

Now you're finally ready to tackle the intake manifold itself. There are 12 bolts keeping this in place (8 short captive bolts that won't come off, and 4 long bolts with small captive washers).
Look around the manifold top and locate the bolt heads. Use a socket with extension to loosen each bolt. You'll soon determine which bolts in the corner will come out. The other eight will NOT lift out and have larger washers.

Gently lift the manifold up, to the left and toward the front of the car. Make sure to check that nothing is still connected and keeping it in place. Watch the solid pipe, on the right, slide out of the manifold and be sure the gasket doesn't get lost! Carefully, place the manifold off to the side.

You should now see both the front three and the rear three spark plug caps, with six rectangular holes in the top of the engine. BE CAREFUL NOT TO DROP ANYTHING DOWN THESE HOLES!!!!! It would be a good idea to cover these up with duct tape while you're working on removing the caps, bolts and finally the spark plugs.

Unclip the ignition wires from the plug caps. Then remove the bolts retaining the caps and place these in cup#5. MAKE SURE NOT TO DROP ANY DOWN INTO THE CYLINDER HOLES.

Pull up the caps slowly with firm force. Do NOT **** them. Some may be stubborn to come off so use steadily increasing force until they pop off the spark plugs and come freely out of the recessed holes.
You'll need a very long socket extension to reach the spark plugs. Replace the plugs with the platinum tipped variety. I doubt you'll want to go through all this again soon to save $10 on parts.

That's IT! Now work backward, replacing or reconnecting parts in the reverse order as you pulled them. Cross each item off as you work backward. Remember to reconnect the battery terminal and test start the car.

Tada !!!! You've just saved yourself a costly maintenance cost and are good for another 100k miles.
Not finding what you are looking for?

98 views

Ask a Question

Usually answered in minutes!

Top BMW Experts

vince

Level 3 Expert

2530 Answers

Steve Sweetleaf
Steve Sweetleaf

Level 3 Expert

1212 Answers

old marine
old marine

Level 3 Expert

2426 Answers

Are you a BMW Expert? Answer questions, earn points and help others

Answer questions

Manuals & User Guides

Loading...