ASUS K8V-MX Motherboard - Answered Questions & Fixed issues

0helpful
3answers

Can not find motherboard name on the motherboard

Try looking the Motherboard manual or  maybe near the PCI slots it should be there
1/12/2021 12:48:02 PM • ASUS K8V-MX... • Answered on Jan 12, 2021 • 210 views
0helpful
1answer

5kpl-vm asus mother board not detected new sata segate HDD how to resolve

The BIOS does not detect or recognize the ATA / SATA hard drive Tips and tricks for troubleshooting a Serial ATA or ATA/IDE internal drive that is not detected in the BIOS. There are six main reasons why a system BIOS will not detect the presence of an internal hard drive. Here is a list of them. They are not in any particular order, but you can follow these steps one by one to troubleshoot this problem:
  1. Drive not enabled in the BIOS
  2. Serial ATA drivers are not properly installed
  3. Faulty or unplugged data cable
  4. Drive is not spinning up
  5. Incorrect jumper settings on the drive
  6. Faulty hard drive
Note: Sections 3, 4, 5, and 6 pertain to PC or Mac systems. Sections 1 and 2 pertain only to PC systems. For more detailed step-by-step troubleshooting on this topic, please see the Seagate Serial ATA troubleshooter "Drive Not Detected" section. After verifying that your ATA or SATA port is set to Auto-Detect or is enabled, if you find that your disk drive is not being detected (auto-detected) by the system BIOS, try the following steps to try and isolate/troubleshoot the problem.
  1. this link can be useful. System setup is where the date and time are stored and where startup preferences like NumLock or Passwords are defined. In addition, many hardware settings are defined in System Setup. In particular, hard disk drives are often controlled here. At the simplest level, hard drives are numbered in Setup as Drive 0, Drive 1, etc or sometimes as Primary Master, Primary Slave. Which ever way these are named, they have a basic ON / OFF setting (sometimes AUTOMATIC or something similar). If your drive is not detected it may be because it is turned OFF in System Setup. In most cases, the boot drive is Drive 0 or Primary Master. When you add a second drive to the system, it may be need to be enabled by turning it ON in System Setup. Sample screen shot showing a Dell System Setup section for disk drives: 48-12s.jpg
  2. 48-1s.jpg
  3. To be able to hit the F6 button, you must restart the Setup process, and watch the bottom of the screen after pressing Enter on the "Welcome to Setup" screen. There will be some moments of files being loaded, and then you should see a message appear that says "Press F6 if you need to install a 3rd party SCSI or RAID driver". This message will only stay on the screen for a couple of seconds, so press F6 as soon as you see it appear. (Click to expand) 48-2s.jpg
  4. After this is done, you will see other messages appear, and it will act as though nothing is happening, but eventually a screen will appear that will allow you to install the drivers for the add-in SATA controller. The screen will look like the sample below: (Click to expand) 48-3s.jpg
  5. After you press S, the driver install process will continue and the floppy diskettes will be needed. Further instructions will be furnished after the driver install process has ended. (Click to expand) 48-4s.jpg
  6. Insert the floppy diskette containing the drivers for the add-in Serial ATA controller.
  7. Once the drivers are loaded, proceed with the normal Windows XP/2000 installation.
A few further notes on the driver diskette: For the hard drive to be detected in a new installation, the drivers for the add-in SATA controller/motherboard must be loaded at the beginning of installation. The drivers for the controller/motherboard can probably be found either on the CD that came with it or on the manufacturer's website. These drivers do not come from Seagate; they come from the motherboard manufacturer. Simply load the required drivers on the diskette and have it ready.
  • Document ID: 182453. Here are some images of Serial ATA cables. Click to expand. 48-6s.jpg 48-7s.jpg
  • The BIOS will not detect a hard disk if the data cable is damaged or the connection is incorrect. Serial ATA cables, in particular, can sometimes fall out of their connection. Be sure to check your SATA cables are tightly connected to the SATA port connection.
  • The easiest way to test a cable is to replace it with another cable. If the problem persists, then the cable was not the cause of the problem.
  • For ATA drives, Seagate recommends using UDMA cabling with a maximum length of 18 inches. UDMA cables have color coded connections which require proper orientation when connecting.
    • Blue connector - always connects to the motherboard.
    • Grey (middle) connector - is used for slave devices on the cable.
    • Black connector - is used for master device connection.
    See this image: (Click to expand) 48-5s.jpg
  • to determine whether it is providing sufficient electrical power to operate the drives and devices you have in your computer.
  • If the drive is still not spinning, connect it in another computer if possible.
  • Connect the drive in a SATA-USB enclosure or something similar if possible.
  • If the drive does not spin up after all of these steps, please visit the Warranty page to begin a warranty replacement order.
  • 48-8s.jpg -- (Click to expand) Jumper settings for Seagate SATA drives -48-9s.jpg -- (Click to expand) Jumper settings for Maxtor-brand SATA drives ATA: It is recommended that all Seagate ATA hard disks supporting the Cable Select jumper option be configured as Cable Select. If your computer system was built prior to October 1998 and does not support UDMA 66 or greater you will be required to use the Master/Slave jumper settings. -48-10s.jpg -- (Click to expand) Jumper settings for Seagate ATA drives -48-11s.jpg -- 
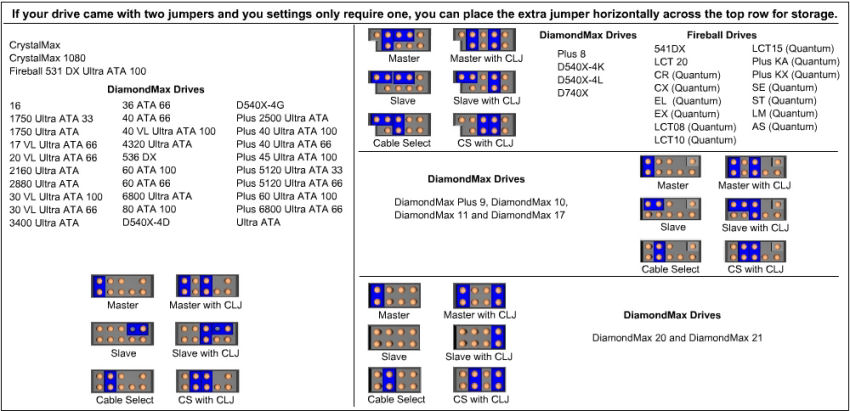
(Click to expand) Jumper settings for Maxtor-brand ATA drives When using Cable Select jumper settings on your ATA drive, all devices connected to the UDMA cable must also use the Cable Select setting. The cable decides master/slave device detection when the cable select jumper settings are used.
  • SeaTools for DOS (see the tutorial here) to test the drive. If SeaTools does not detect the drive after the steps followed above, or an error code that signifies drive failure displays, please proceed to the our Warranty Services page to begin a warranty replacement order.
  • The BIOS does not detect or recognize the ATA SATA hard drive
    1/16/2015 6:19:38 PM • ASUS K8V-MX... • Answered on Jan 16, 2015 • 224 views
    0helpful
    1answer

    I want to install windows 7 32 bit on Asus K8V-MX motherboard. May I find drivers for windows 7? On Asus site there are not. Thank you.

    that is a very old chipset, i have a similar board, but it is an ABIT brand, which is now out of business, and it is not compatible with windows 7. i am sorry, but, if the manufacturer had no windows 7 drivers, you may only be able to upgrade as far as windows vista. sometimes, you can get vista drivers to work in windows 7, but i really doubt that it will be that easy. if you describe why you need a new os, and what you use the computer for, i might have better recomendations than vista.
    1/1/2015 6:47:59 AM • ASUS K8V-MX... • Answered on Jan 01, 2015 • 351 views
    0helpful
    1answer

    Falta el controlador de panel tactil

    http://support.asus.com/Download.aspx?SLanguage=en&m=K8V-MX
    5/31/2014 4:23:23 AM • ASUS K8V-MX... • Answered on May 31, 2014 • 91 views
    0helpful
    1answer

    I want to install graphics driver for chipset via k8m800 for windows 8

    http://ez93.com/dl/driver-k8m800.html
    5/23/2014 5:32:07 AM • ASUS K8V-MX... • Answered on May 23, 2014 • 109 views
    0helpful
    1answer

    I had to get my C drive formatted and reloaded

    get a sound card
    5/21/2014 5:51:02 AM • ASUS K8V-MX... • Answered on May 21, 2014 • 42 views
    0helpful
    2answers

    Mother board driver problem...

    You will need to open the computer case and look for the model number on the motherboard. Usually it will be in bigger font than other text. When you find it, you will need to search google for that model number and get the drivers from the manufacturer website and install them.
    5/4/2014 8:01:31 PM • ASUS K8V-MX... • Answered on May 04, 2014 • 193 views
    0helpful
    2answers
    0helpful
    2answers

    A demon materialised while pooting error code 18

    are you root? is usb debugging on?
    3/13/2014 10:27:10 PM • ASUS K8V-MX... • Answered on Mar 13, 2014 • 186 views
    0helpful
    1answer

    Asus K8v-MX Unable to Boot - "MotherBoard Main

    check video card and all power plugs to board
    11/11/2013 8:35:46 AM • ASUS K8V-MX... • Answered on Nov 11, 2013 • 132 views
    0helpful
    1answer

    I NEED TO DOWNLOAD A SOUND CARD FOR MY ABOVE

    Please remove me from your mailing list mazajak sms and unsubscribe me. qatar +97466297835
    8/5/2013 11:17:49 AM • ASUS K8V-MX... • Answered on Aug 05, 2013 • 42 views
    0helpful
    1answer

    Drivers for ASUS K8V-MX Motherboard for windows 8

    Hello here is the asus homepage:http://support.asus.com/download.aspx?SLanguage=en&p=1&s=20&m=K8V-MX&os=&hashedid=dJ2XP7zr8tzeYbLpHere is no drivers for windows 8.Add a graphic card on the mainboard. This mainboard probably has the AGP slot, for adding a graphic card.You just have to make sure, the driver is available for windows 8.You can try the VIA drivers here:http://www.viaarena.com/drivers.aspxBut i can`t give you a guaranty, the driver will work.Good luck
    3/24/2013 3:07:49 PM • ASUS K8V-MX... • Answered on Mar 24, 2013 • 500 views
    0helpful
    1answer

    Sound and video drivers

    That would be Audio and VGA drivers,http://support.asus.com/Download.aspx?SLanguage=en&m=K8V-MX&p=1&os=Since the version of the Windows operating system you are using, wasn't stated; I'm going to use WinXP 32-bit for an example.(WinXP is stated in the list. When there is no bit version listed, it is automatically assumed to be a 32-bit version.If you have Windows XP on your Asus motherboard, and 64-bit is not touted all over the place, it IS -> WinXP 32-bit)Audio:Click on the + sign next to Audio (1)To the right of -> Download from, click on the blue -> GlobalA small window will come up -Opening SoundMAX512015150.zipMake SURE there is a Green dot in the small circle, to the left of Save File.IF not; left-click in the empty circle to the left of Save File.Now go below in the window, and click on OK.A small download window will come up.Allow the file to download all the way, then DOUBLE-click right on the file name.[If you get a couple of Microsoft 'Squawk Boxes', just click on OK, and Run. If you would like me to explain why they came up, Can Do.Just post back in a Comment ]In the next small window go to the left side, click on -Extract all files.At the bottom of the next 3 small windows, click on -Next, Next, and Finish.[NO. Do NOT change any settings in the second small window.Just click on Next, Next, and Finish]If your computer asks you to restart -> NO.Go back to Asus Support, and download the VGA drivers.After installing the VGA drivers, THEN restart the computer.If you do NOT have the Volume icon in the system tray, at the bottom of your monitor screen; post in a Comment.For additional questions post in a Comment.Regards,joecoolvette
    2/19/2013 9:55:39 PM • ASUS K8V-MX... • Answered on Feb 19, 2013 • 34 views
    0helpful
    1answer

    No Detect sound driver

    Go to http://support.asus.com/Download.aspx?SLanguage=en&m=k8v-mx&p=1&os= Select OS. Download from global icon in Audio. Unzip and run setup.
    12/7/2012 3:08:47 PM • ASUS K8V-MX... • Answered on Dec 07, 2012 • 32 views
    0helpful
    4answers

    Motherboard drivers

    Here is the website but I would check the model number. I could not find it. 

    http://support.asus.com/download/download.aspx?SLanguage=en-us
    12/6/2012 2:15:41 PM • ASUS K8V-MX... • Answered on Dec 06, 2012 • 140 views
    0helpful
    8answers

    Motherboard drivers

    you need the following drivers
    chipset
    audio
    video
    network
    download them from Dell's website
    log on to http://support.dell.com/support/downloads/index.aspx?~ck=ln&c=us&l=en&lnki=0&s=gen
    click on service tag option
    enter your system's service tag
    your system's service tag located at the bottom pannel of your system, turn it upside down you will find a bar coded sticker which has a 7 digit alphanumeric number.
    next page will give you all the drivers compatable with your system
    be sure you choose operating system as windows XP
    download all the drivers and remember to install them in the same order
    chipset
    audio
    video
    network
    12/6/2012 2:10:28 PM • ASUS K8V-MX... • Answered on Dec 06, 2012 • 1,456 views
    0helpful
    1answer

    After file copying system faild to boot shows windows logo and restarts

    laptop or desktop computer ?

    Test your PSU power supply unit or replace it if your power supply units fan is not working your PSU is faulty

    http://pcsupport.about.com/od/toolsofthetrade/f/powersupplytest.htm

    One bad lead can cause a computer to continue on a cycle of restarting or to shutdown or fail to detect/ boot up a computer hard drive

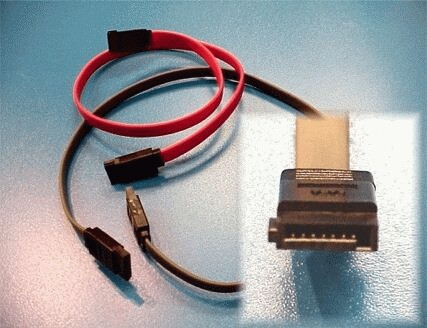
    Test all leads that attach to your hard drive power and data cables IDE SATA

    the leads from your MOTHERBOARD TO YOUR HARD DRIVE make sure they have a secure dust free connections and are not faulty or just replace them they could be faulty make sure all leads that are attached to your dvd\cd floppy drives have secure connections and are not faulty or just replace them they could be faulty computers need power and data to travel through every working device to continue its cycle and have an end so any faulty leads will end up with a computer error even something as small as a faulty electrical or fan lead can cause you problems

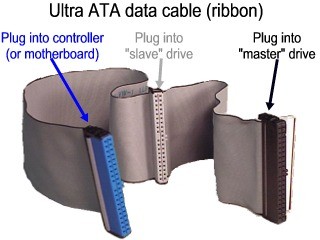
    motherboard and a hard drive any leads between them will fail before your motherboard or your hard drive if its a flat ribbon 40 pin type IDE replace it this will be the first to fail

    check all electrical power input and extensions make sure they are securely seated even the cd/dvd floppy drives need to have current go through make sure these drives are working

    also check the Cmos battery and computer RAM modules make sure they are securely seated with no dust built up or in the sockets on some motherboards cmos batteries are soldered in check you CPU central processing unit make sure its securely seated and has thermal paste it might be getting to hot the thermal paste will help disperse the heat Thermal compound is a sticky paste that is placed directly onto the CPU. Allowing for a more direct heat transfer between the CPU and HEAT SINK and preventing air gaps from forming between the CPU and heat sink.

    http://www.hardwaresecrets.com/article/Thermal-Compound-Roundup-February-2012/1490

    another possible reason could be a memory dump you might be running to many programs at the one time putting to much strain on the CPU central processing unit if you can get a screen scroll to bottom toolbar bottom of screen right click select task manager applications you will see whats running if you see anything you dont need running select end now also under processes see what is ticking over again if you see something you don't need to be running end now or you might uninstall that program and some unnecessary programs

    not having enough computer ram can cause memory dumps

    If you are not sure if a module is right for your system use the Crucial Memory Advisor tool for a list of guaranteed compatible modules.

    first you will need to select the manufacturer from a drop down list then select your product line from a drop down list then select the model then click find it will take you directly to compatible ram also you will have an option to scan your system

    you should always for a guarantee on any ram modules when purchasing them or buy working pairs if possible

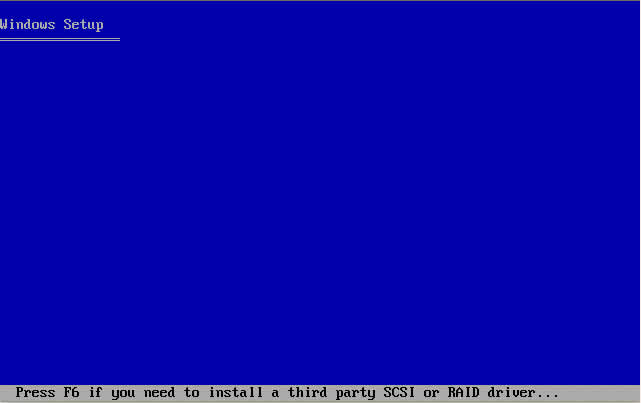
    or try safe modeRestart your computer repeatedly tapping the f8 key to enter safe mode while the screen is black once in safe mode where the only things working will be your keyboard and mouse allowing you to attempt to repair your computer

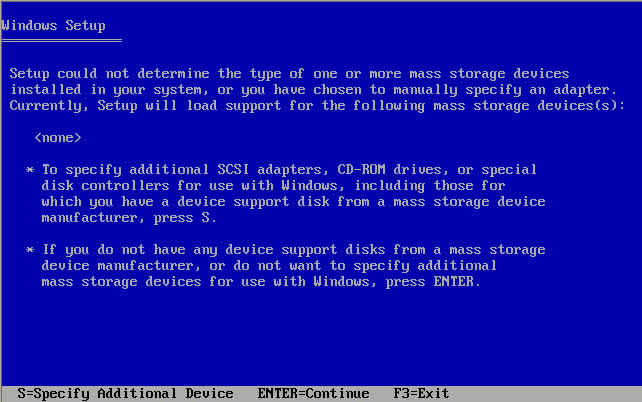
    If done properly the user should get to a screen similar to the below screen.

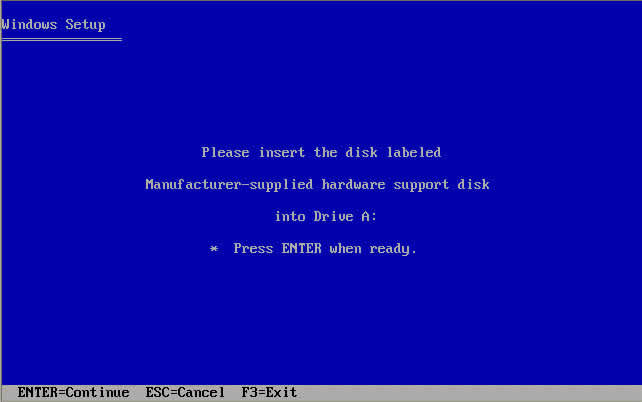
    Select the option for Safe mode command prompt only

    Windows Advanced Options MenuPlease select an option:

    Safe ModeSafe Mode with NetworkingSafe Mode with Command Prompt

    Enable Boot LoggingEnable VGA modeLast Known Good Configuration (your most recent settings that worked)Directory Services Restore Mode (Windows domain controllers only)Debugging Mode

    Start Windows NormallyRebootReturn to OS Choices Menu

    Use the up and down arrow keys to move the highlight to your choice.

    select safe mode with command prompt then type in chkdsk/f/r which will scan for and and attempt repair of bad files and bad sectors on hard drive

    you should have no input while chkdsk utility is in progress any input might further damage your computer or

    Use the System File Checker tool (SFC.exe) to determine which file is causing the issue and then replace the file.

    Type the following command and then press ENTER: sfc /scannow The sfc /scannow command scans all protected system files and replaces incorrect versions with correct Microsoft versions.

    hope this helps

    10/10/2012 9:59:07 PM • ASUS K8V-MX... • Answered on Oct 10, 2012 • 147 views
    0helpful
    2answers

    Smps transistors failed

    It is difficult (or impossible) to tell exactly what caused the transistors to go bad. Sometimes they just fail because they were a little weak, or other parts went bad first and caused the transistors to be damaged. Parts get weaker and values change over time and with use, and failures can happen. The UPS can't stop damage to the power supply if some part inside the supply goes bad, but it is still good to have one. New 450 to 500 watt power supplies can be purchased for $30 to $50 (or more).
    9/18/2012 11:33:44 PM • ASUS K8V-MX... • Answered on Sep 18, 2012 • 323 views
    0helpful
    2answers

    My motherboard's drivers are not supporting in windows 7

    my pc not instal audio
    7/30/2012 11:57:50 AM • ASUS K8V-MX... • Answered on Jul 30, 2012 • 642 views
    0helpful
    1answer

    Looking for wiring diagram

    The information you need is in the pdf below. Look at page 1-26 in particular.http://dlcdnet.asus.com/pub/ASUS/mb/sock754/K8V-MX/E2335_K8V-MX_h.pdf
    6/6/2012 2:07:56 AM • ASUS K8V-MX... • Answered on Jun 06, 2012 • 131 views
    Not finding what you are looking for?
    ASUS K8V-MX Motherboard Logo

    464 questions posted

    Ask a Question

    Usually answered in minutes!

    Popular Products

    Top ASUS Computers & Internet Experts

    Grand Canyon Tech
    Grand Canyon Tech

    Level 3 Expert

    3867 Answers

    Brad Brown

    Level 3 Expert

    19187 Answers

    Paul Bade

    Level 3 Expert

    1818 Answers

    Are you an ASUS Computer and Internet Expert? Answer questions, earn points and help others

    Answer questions

    Manuals & User Guides

    Loading...