Brother DCP-195C Inkjet Multifunction Printer - Colour - Photo Print - Logo

Related Topics:

A
Anonymous Posted on Aug 13, 2017

Ink cartridge problem

Hi :) my printer can't detect ink cartridges , it tells me on the LCD that : replace BK ink , replace Y ink etc.. after doing that , it says : can't detect BK ink , can't .... etc and it's not accepting the cleaning order or any another order but i see that there's enough ink in the cartridges throughout the transparent place on the cartridge so , help pleaaase <3

1 Answer

Ubaid abid

Level 2:

An expert who has achieved level 2 by getting 100 points

All-Star:

An expert that got 10 achievements.

MVP:

An expert that got 5 achievements.

Guru:

An expert who has written 7 tips or uploaded 3 video tips

  • Expert 164 Answers
  • Posted on Apr 13, 2019
Ubaid abid
Expert
Level 2:

An expert who has achieved level 2 by getting 100 points

All-Star:

An expert that got 10 achievements.

MVP:

An expert that got 5 achievements.

Guru:

An expert who has written 7 tips or uploaded 3 video tips

Joined: Apr 13, 2019
Answers
164
Questions
0
Helped
122989
Points
609

First you need check your ink cover is probably working like open close after that open ink cover and install cartridges slowly

5 Related Answers

Anonymous

  • 2985 Answers
  • Posted on May 17, 2007

SOURCE: Printer will not print.

http://www.fixya.com/support/p169991-brother_mfc_420cn_all_in_one_inkjet See if any of these solutions help

Ad
A

Anonymous

  • Posted on Sep 19, 2007

SOURCE: Printer won't work

try this : press menu,2864,*.....to neter maintenance mode....after press 7,6,4 and black start key. This will purge the machine do it about 2-3 time to make shure. It can take from 3 -5 minutes each time you try it. If it don't work.....sorry but you will have to change your print head...... need other tips : [email protected]

Anonymous

  • 832 Answers
  • Posted on Mar 04, 2008

SOURCE: MFC 210C Ink Problems

Steve,

did you watch the display after replacing the cart?
Very often the machine asks if you have changed the cart and demands an answer (1 for yes).

You can try to do an update of the firmware, too. Go to www.brother.com , choose your country and then your machine. Download a small update tool and run it.

If it aint getting better:
Do unplug from power outlet (even though you have done already) wait 10 Min. leave scanner cover open and take all carts out. Plugin to power again and leave scanner open. Wait uintil machine gives a warning signal. Reinsert carts and close cover: now watch the display and give always the answer YES(1).

Anonymous

  • 2 Answers
  • Posted on Jul 13, 2008

SOURCE: Printer Brother DCP115C 8 months old Won't accept a new ink cartridge

The printer says that when you use other brands of ink other than recommended. I get it happening all the time. When it happens just press Stop/Exit and the printer will work fine.
Cheryl.

Anonymous

  • 1 Answer
  • Posted on Sep 02, 2008

SOURCE: Cartridge not detected

This problem seems to be caused by the gray horseshoe-shaped sensor behind the cartridges. I tried cleaning them with a cotton swab, and found that the "No Cartridge" message turned off when the swab was in the sensor.

So if you put something (like a tiny piece of cotton) in the cavity about halfway up the cartridge (so that it takes up space in the sensor when you replace the cartridge), you can trick the sensor into thinking the cartridge is there.
If it doesnt work the first time, try rearranging the cotton (or whatever you put) or putting more in.

Ad

Add Your Answer

×

Uploading: 0%

my-video-file.mp4

Complete. Click "Add" to insert your video. Add

×

Loading...
Loading...

Related Questions:

0helpful
2answers

Do I have to replace the color ink cartrigdes in my epson xp-610 printer

Q:


How do I change the ink cartridges?


A:


Do the following:
Removing and Installing Ink Cartridges
Make sure you have your replacement cartridges handy before you begin. You must install new cartridges immediately after removing the old ones. Caution:

Leave your old cartridges in the printer until you are ready to replace them to prevent the print head nozzles from drying out. Do not open ink cartridge packages until you are ready to install the ink. Cartridges are vacuum packed to maintain reliability.


  1. Make sure that the CD/DVD tray is not inserted for printing.


  2. Turn on your product.


    • If an ink cartridge is expended, you see a message on the LCD screen. Note which cartridges need to be replaced and press OK . Then select Yes, replace now and press OK .


    • If you are replacing a cartridge before you see a message on the LCD screen, press the left or right arrow buttons, select Setup > OK > Maintenance > OK > Ink Cartridge Replacement > OK . Then press the start_black_icon.jpg start button.


  3. Lift up the scanner unit.


    scanner_unit_open_xp600.jpg


    Caution:

    Do not move the print head by hand; otherwise, you may damage your product. Do not touch the flat white cable inside the printer.


  4. Push in the blue tab to unlock the ink cartridge you are replacing. Then lift the bottom of the ink cartridge to remove it.


    ink_cartridge_tab_push_xp600_800.jpg


    Warning: If ink gets on your skin, wash it thoroughly with soap and water. If ink gets into your eyes, flush them immediately with water. If ink gets into your mouth, spit it out and see a doctor right away. Keep ink cartridges out of the reach of children.


  5. Recap the used ink cartridge using the cap that came with it.


    ink_recap_xp600_800.jpg


    Note: Dispose of used cartridges carefully. Do not take the used cartridge apart or try to refill it.


  6. If you are replacing the Black (BK) ink cartridge, it is recommended that you shake the new cartridge gently four or five times before unwrapping it. You do not need to shake the Photo Black (PBK) cartridge or any of the other color ink cartridges.


    ink_shake_xp600_800.jpg


    Caution:

    Do not shake the cartridges after opening the packages, or ink may leak.


  7. Remove the cartridge from the package.


    ink_package_open_xp600_800.jpg


    Caution:

    Do not touch the areas shown above. Doing so may prevent normal operation and printing.


  8. Remove the cap from the cartridge and store it in the bag that came with your product for later use.


    ink_cap_remove_store_xp600_800.jpg


    Note: Save the cap so you can recap ink cartridges before storing or disposing of them.

    Caution:

    Do not remove any other labels or seals, or ink will leak.


  9. Insert the ink cartridge head first into the ink cartridge holder. Then press the bottom of the ink cartridge down until it clicks into place.


    ink_cartridge_insert_xp600_800.jpg


  10. Once you replace all the cartridges that need replacing, close the scanner unit.


    ink_cartridge_scanner_unit_lower_xp600.jpg


    The product starts priming the ink. This takes a few minutes. When you see a completion message on the LCD screen, ink replacement is complete. Note: If you see an error screen telling you an ink cartridge is installed incorrectly, lift up the scanner unit and press the ink cartridge down until it clicks into place. When you\'re finished, close the scanner unit.


If you remove a low or expended ink cartridge, you cannot re-install and use the cartridge.

Caution:

If you remove an ink cartridge for later use, recap the ink cartridge using the cap that came with it to prevent the ink from drying out and to protect the surrounding area from getting smeared by ink. Store the ink cartridge in the same environment as the product. Do not leave the product with the ink cartridges removed for an extended period of time. Otherwise, ink remaining in the print head nozzles may dry out and you may not be able to print.

http://youtu.be/xJsDu52txEA


0helpful
1answer

I have replaced black ink but printer keeps telling me to replace black ink cartridge

If the it's a remanufactured cartridge (not genuine), the printer will not detect the ink in the cartridge.
If it's genuine, you might want to give Lexmark's technical support a call to have the cartridge replaced.
0helpful
1answer
0helpful
1answer

I refilled my Lexmark cartridge but it continues to say I need to install a new cartridge. The printer model is x2670.

Hello there,

The reason why your Lexmark printer keeps on telling you to install new cartridge because the printer have ink cartridge detection. Meaning it will detect whether that particular cartridge is an old one or not.

Each Ink Cartridges have its code and it will be registered to the printer once you have connected it. The printer will assume the ink level and once it is empty, that particular Lexmark Ink Cartridge will be registered to your printer as an empty ink cartridge and needed to be replace with a new one.

I would suggest getting a genuine new cartridge instead of refilling the ink cartridges.
10helpful
2answers

How to reset ink level canon iP 2772??

Download and run the ipTool to reset your ink level :


http://www.mediafire.com/?nmj5nnzzjaw


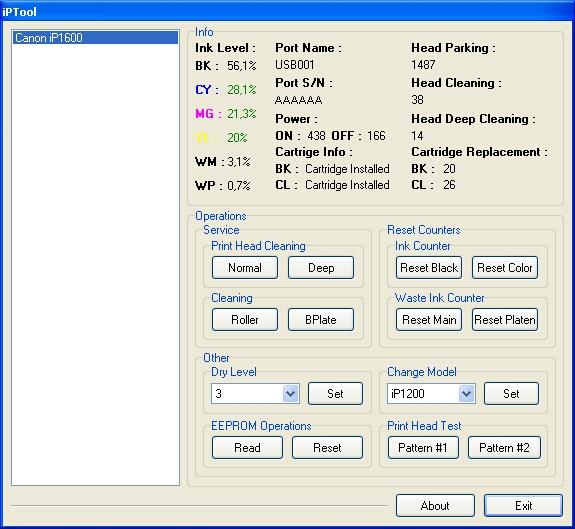
Features IP Tool software:

  • Showing all info on the printer such as ink level, ink counter number of cleaning, cartridge replacement and more.
  • Print test feature to test nozzle on the cartridge.
  • Cleaning and deep cleaning feature to clean head cartridge and cleaning the rollers.
  • Changing the delay value for drying.
  • Set the printer model manually.
  • Reading and reset EEPROM printer.
  • Reset counter and reset ink level on the color and black cartridges.
Ink Level - shows the level ink:
  • BK - black cartridge.
  • CY - Cyan cartridge.
  • MG - Magenta cartridge.
  • YL - Yellow cartridge.
  • WM - Waste ink counter status.
  • WP - "additional" waste ink counter status.
Port Name - displays the port where the printer installed.
Port S / N - shows the serial number of the printer port.
Power - shows the number of:
  • ON - inclusions printer.
  • OFF - to turn off the printer.
Cartridge Info - Displays information status of:
  • BK - black cartridge.
  • CL - colored cartridge.
Head Parking - displays the number of parking.
Head Cleaning - shows the number how many time the cartridge cleaned.
Head Deep Cleaning - displays the number of deep cleaning Printer cartridge.
Cartridge Replacement - shows the number of cartridge replacements:
BK - black cartridge.
CL - colored cartridge.


Click on this link or copy and paste the complete link into your browser.

If I could be of further assistance, let me know. If this helps or solves the issue, please rate it and give a testimonial for my response. Happy Holidays!

Thanks, Joe


I’m happy to assist further over the phone at https://www.6ya.com/expert/joe_8b8c2cd6ce148309

0helpful
1answer

Where do the ink cartriges on a brother mfc 5460cn fo

Your machine is equipped with an ink dot

counter. The ink dot counter automatically

monitors the level of ink in each of the 4

cartridges. When the machine detects an ink

cartridge is running out of ink, the machine

will tell you with a message on the LCD.

The LCD will tell you which ink cartridge is low

or needs replacing. Be sure to follow the LCD

prompts to replace the ink cartridges in the

correct order.

Even though the machine tells you that an ink

cartridge is empty, there will be a small

amount of ink left in the ink cartridge. It is

necessary to keep some ink in the ink

cartridge to prevent air from drying out and

damaging the print head assembly.

a Open the ink cartridge cover.

If one or more ink cartridges are empty,

for example Black, the LCD shows

Ink Empty Black and

Replace Ink.

b Pull the lock release lever down and

take out the ink cartridge for the color
shown on the LCD.

c Open the new ink cartridge bag for the

color shown on the LCD, and then take

out the ink cartridge.
d Remove the protective yellow cap (1).

Note

If the protective yellow caps come off

when you open the bag, the cartridge will

not be damaged.

e Each color has its own correct position.

Insert the ink cartridge in the direction of

the arrow on the label.

f Lift each lock release lever and push it

until it clicks, and then close the ink

cartridge cover.

g If you replaced an ink cartridge, the LCD

may ask you to verify that it was a brand

new one. (For example,

Did You Change Blck?) For each

new cartridge you installed, press 1

(Yes) to automatically reset the ink dot

counter for that color. If the ink cartridge

you installed is not a brand new one, be

sure to press 2 (No).

If you wait until the LCD shows

Near Empty and Ink Empty, the
machine will automatically.

Find this on page 113 of the manual:
http://welcome.solutions.brother.com/BSC/public/files/dlf/doc002135/cv_mfc5460_usaeng_usr_a.pdf


Click on this link or copy and paste the complete link into your browser.

If I could be of further assistance, let me know. If this helps or solves the issue, please rate it and give a testimonial for my response.

Thanks, Joe


I’m happy to assist further over the phone at https://www.6ya.com/expert/joe_8b8c2cd6ce148309

0helpful
2answers

The printer keeps messaging ink on sseveral colours is low but it is not. Have even tried new cartridges but no difference, same message . Seems to be misreading ink level

Some printers need special software (that shipped with the printer) to "tell" the printer that the ink-cartridge has been replaced, and that the ink-levels need to be fully "reset".
0helpful
1answer

Replace yellow ink but machine says no cartridge

Hello,

When you get the "no cartridge" message it's because one of the sensors does not recognize ink in one of the cartridges.

First open the ink cover and read the LCD screen.
The LCD will tell you which cartridge is having a problem. You should change which ever cartridge is telling you there is a problem.

If the LCD says there is a problem witht he yellow (which you just changed) then follow the below steps.

1. Unplug the power to the printer.
2. Remove all 4 ink cartridges.
3. Close the ink cover with all the inks removed.
4. Plug the power back in.
5. When the LCD says "ink empty" you will reinstall all 4 ink cartridges.

Thank you,
0helpful
1answer

I have a Brother MFC5460CN...I can't find the owners manual and I can't figure out where the ink cartridges are? I need to replace them

I found this on the Web site. You can download the manual for yourself. Just click on the link below. If you find this information helpful, pls rate me.

http://www.retrevo.com/d/ds/progress?doc=9adbcf37695f2981dab6cde6d0fdb2d1

Replacing the ink cartridges B
Your machine is equipped with an ink dot counter. The ink dot counter automatically
monitors the level of ink in each of the 4 cartridges. When the machine detects an ink cartridge is running out of ink, the machine will tell you with a message on the LCD. The LCD will tell you which ink cartridge is low or needs replacing. Be sure to follow the LCD prompts to replace the ink cartridges in the correct order.
Even though the machine tells you that an ink cartridge is empty, there will be a small amount of ink left in the ink cartridge. It is necessary to keep some ink in the ink cartridge to prevent air from drying out and damaging the print head assembly.
a Open the ink cartridge cover. If one or more ink cartridges are empty,
for example Black, the LCD shows Ink Empty Black and Replace Ink.
b Pull the lock release lever down and take out the ink cartridge for the color
shown on the LCD.

C Open the new ink cartridge bag for the color shown on the LCD, and then take
out the ink cartridge.
d Remove the protective yellow cap (1). Each color has its own correct position.
Insert the ink cartridge in the direction of the arrow on the label.
f Lift each lock release lever and push it until it clicks, and then close the ink
cartridge cover.
G If you replaced an ink cartridge, the LCD
may ask you to verify that it was a brand
new one. (For example, Did You Change Blck?) For each
new cartridge you installed, press 1 (Yes) to automatically reset the ink dot
counter for that color. If the ink cartridge you installed is not a brand new one, be
sure to press 2 (No). If you wait until the LCD shows
Note
If the LCD shows No Cartridge after
you install the ink cartridges, check that
the ink cartridges are installed properly.

09ec622.jpg
Pls rate met. Thanks and Good Luck.....
0helpful
1answer

Print cartridges

  1. When one or more ink cartridges are empty, for example, Black, the LCD shows “Ink Empty Black” and “Open Cover.” Close the printer’s document support and the document tray.
  2. Lift the top cover to the open position until it locks securely into place.
  3. Pull the ink cartridge hook toward the front of the printer and remove the color ink cartridge displayed on the LCD. Place the cartridge in a plastic bag as it may still contain some residual ink and may leak.
  4. Open the new ink cartridge bag for the color shown on the LCD and remove the new ink cartridge. The cartridge cover may come off when you open the bag. This is not uncommon and will not damage the cartridge.
  5. Each color has its own correct position that is clearly labeled and color coded inside the printer. Keep the ink cartridge in an upright position when you insert it into slot. It will only fit in the correct direction. Press down on the ink cartridge until the hook snaps over it.
  6. If you replaced an ink cartridge while “Near Empty” was displayed on the LCD, the LCD may ask you to verify that the replacement cartridge was brand new one. Example: “Did You Change Black? 1.Yes 2.No.” For each new cartridge you installed, press 1 on the dial pad to automatically reset the ink dot counter for that color. If the ink cartridge you installed is not a brand-new one, select 2.
Not finding what you are looking for?

115 views

Ask a Question

Usually answered in minutes!

Top Brother Office Equipment & Supplies Experts

Norman Weimar
Norman Weimar

Level 3 Expert

7035 Answers

Cindy Wells

Level 3 Expert

6688 Answers

k24674

Level 3 Expert

8093 Answers

Are you a Brother Office Equipment and Supply Expert? Answer questions, earn points and help others

Answer questions

Manuals & User Guides

Loading...