I was reading some articles in a website and i found out that there is a problem with the Samsung DLP.
If you don't install firmly the connectors may cause damage to both the ballast and the lamp and maybe you can get small fire...
i will add a picture of the connector and the link to the blog.
so if you are installing your TV lamp do it the correct way so this wont happen..
good luck
-----------------------------------
this is a connector image..

--------------------------------------------------------------------
http://www.fixyourdlp.com/2010/03/22/damage-or-fire-warning-on-samsung-dlp-television-bp96-01653a-lamp/
---------------------------------------------------------------------
Please read carefully!
FixYourDLP.com has identified a potential hazard that may severely
damage your Samsung TV with lamp code BP96-01653A!
Samsung DLP lamp units, model BP96-01653A may fail due to improper
insertion. We discovered this while doing some tests on these
enclosures. If you don’t install the BP96-01653A firmly into the TV, the
housing connector may cause damage to both the ballast and the lamp—or
even worse a fire.
You’ll know immediately if there’s something wrong because as soon as
you turn your television on, and there’s white smoke emanating from the
back of your television.
You should shut your television off immediately and open your lamp
door and pull out that lamp. Inspect it and hopefully, you’ve just
burned the connectors to the ballast, and not the ballast itself. Our
testing has only caused the connectors to burn or melt, but don’t take
any chances—we’ve never seen a fire, but we also don’t rule out the
possibility of fires either.
Here is a correct installation method and the reasons why a bad
installation will cause the connectors to burn:
IMPORTANT SAFETY WARNING
Regarding the installation of a BP96-01653A lamp unit into a Samsung
DLP Television.
Installation
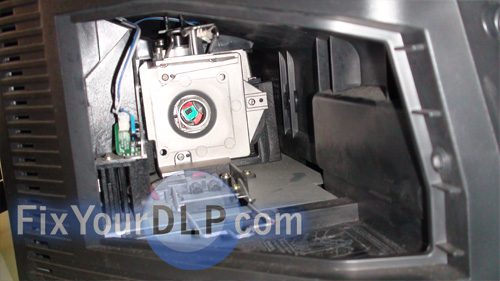
Step 1
 Figure A – Open panel,
lamp unit removed
Figure A – Open panel,
lamp unit removed
You must install the lamp unit to fit snug with the ballast connector.
To do this, align the lamp unit with the female ballast connector
facing down, on the bottom side of the enclosure, then slide the lamp
unit until it snaps into place. Check to make sure the unit is firmly
inside the television.
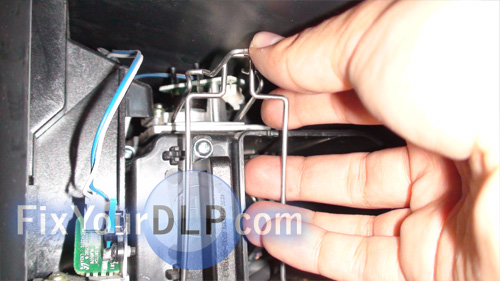
Step 2
 Figure B – Snapping the
lamp into place
Figure B – Snapping the
lamp into place
Snap the wire brackets in tightly by lifting the bottom set up to
meet with the top bracket. The wire bracket keeps the lamp and lamp
enclosure seated properly to reduce the risk of fire.
when installed properly, the unit should sit secure and slightly
elevated from the floor of the compartment.
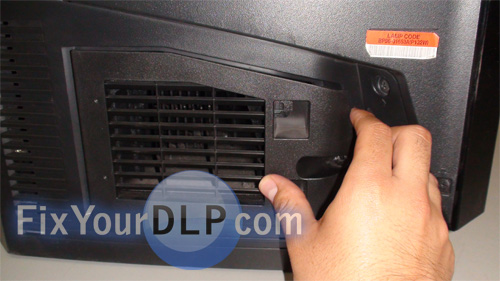
Step 3
 Figure C – Close back
panel securely
Figure C – Close back
panel securely
Once the lamp is firmly secure, close the back panel to engage the
blue lamp door sensor switch. Leaving the door open will prevent the
television from starting up.
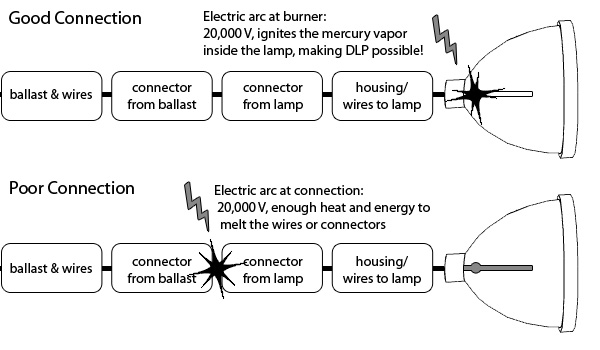
Important Damage or
Fire Warning
Because of the nature of
the ballast or lamp driver, there is a risk of damage or fire to your
television set.
The ballast ignites the lamp
with up to 20kV of electricity to arc the gas tube inside. If the
ballast does not have a firm connection with the lamp unit, the arc will
occur between the ballast connectors (from the ballast to the lamp),
which may cause a fire, or melt your plastic connectors. Indications of
this are a rapid clicking sound, a burning smell, and/or a
non-functioning lamp. If you improperly install the lamp into your
television causing a ballast or lamp failure, this may void your
warranty for the television or the lamp product.


where can I get schematics (PDF?) of the area to replace caps?
Update: I did nothing to the TV but just powerd it up thi monring. Now, they TV stays on and I get very ppro picture quality. Grainy lines appear and disappear on screen. Colors are not true. The bulb is staying lit and I can circulate through the TV menus.
IS this stil a cap problem or something else?
The Jamicon capacitors were indeed one of the issues. There were four (4) 16V 1000uF caps and two (2)Nichicon 10V 3300uF caps swollen and these were replaced. I bit the bullet and got a local Mistu tech to come out and replace the caps. The lamp now lights and I thought all was good but it appears (according to the tech) that the FMT board is having problems. This is the second issue. The tech had two other units (boards, rack, power suplpy etc...) pulled from other TVs ready to ship back to Mitsu...apparantly Mitsu does not just sent out replacement FMT boards and they are having the whole components pulled from tvs and then shipped out to MDEA. So while my lamp lights, there are still intermittent video distortions on the screen that appear every 10 seconds or so. Great picture one minute, then a fuzzy disturbance for ~1s then great picture again. I am hoping the FMT board does not go b/c that will add to my already growing repair bill...
×