At Fixya.com, our trusted experts are meticulously vetted and possess extensive experience in their respective fields. Backed by a community of knowledgeable professionals, our platform ensures that the solutions provided are thoroughly researched and validated.
I had to get a new hard drive and i want to get photos that are on a sub folder in my iphone uploaded into my laptop.
I have VISTA and windows 2003
can you help me.
They are my wedding photos! and the old drive is corupted totlaly!!!
Bella
On Windows computer, you can complete this task easily with Windows Explorer. Just follow the below steps.
Windows Explorer allows people to browse and handle iPhone photos directly on Windows computer. What you need to do is simply plug external hard drive and iPhone to computer.
Connect external hard drive to computer.
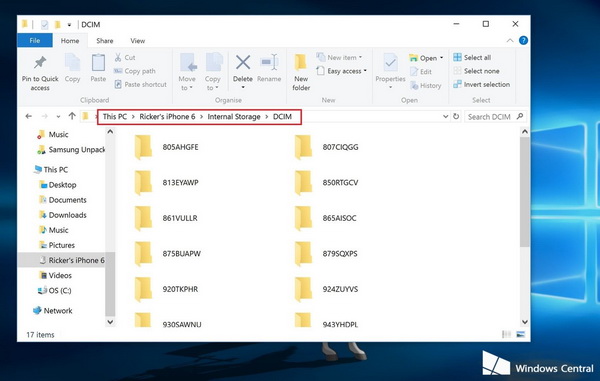
Plug iPhone to computer. Go to My Computer and open iPhone device. You can go to your iPhone > Internal Storage > DCIM and select all photos on iPhone, then click "Ctrl + C".
Open the external hard drive and go to the folder you want to save photos. Click "Ctrl + V" to transfer photos from iPhone to external hard drive.
Windows Explorer could be the best way for you to export photos from iPhone to external hard drive without any cost. Of course, there are still other effective solutions for you to do this.
- If you need clarification, ask it in the comment box above.
- Better answers use proper spelling and grammar.
- Provide details, support with references or personal experience.
Tell us some more! Your answer needs to include more details to help people.You can't post answers that contain an email address.Please enter a valid email address.The email address entered is already associated to an account.Login to postPlease use English characters only.
Tip: The max point reward for answering a question is 15.
How to Transfer Photos: Windows Vista/7 Users
If you have Windows 7 or Vista, there are two easy ways to transfer your photos directly to your desired folder or directory.
AutoPlay Method
When your iPhone device is connected, click on the Start Menu, and then Control Panel. Click Hardware and Sound. Select AutoPlay, scroll down to find where your iPhone device is listed, open the drop-down menu, and select "Ask me every time."
Step 1 - Connect your iPhone device
If you enabled the AutoPlay behavior using the method described above, you can skip this step, because your iPhone is already plugged in. If not, connect your device using the appropriate USB cable that your phone came with.
Step 2 - Import Pictures and Video
The AutoPlay prompt should appear with your device type listed at the top. Click the first link that says "Import Pictures and Video."
If for some reason the AutoPlay prompt did not appear, go to Start, then Computer, then right click on the icon for your iPhone device and select "Import pictures and video" from the context menu that appears.
Step 3 - Choose a directory, and import
Before you click Import, go to Import Settings, and select the "Import to" field to select the destination you want your photos to transfer to. By default, they will transfer to your My Pictures folder. You can also select the "Always erase from device after copying" option, though this is, as always, optional.
Click OK, then click Import, and your photos will be transferred to their designated directory.
Windows Explorer
If you don't want to mess with AutoPlay, you can find and transfer your photos manually using Windows Explorer.
Step 1 - Connect your iPhone device Step 2 - Click Start, then Computer
This should take you to a Windows Explorer page that lists your hard disk drive(s), and devices with removable storage. If connected properly, your iPhone device will register as a device with removable storage, and you will see the icon for it listed below this header.
Step 3 - Double-click your device's logo in Windows Explorer
Double-clicking your device will open it up as a directory, full of folders and sub-folders that store all of your phone's content.
Step 4 - Open your camera folder
Your camera folder should be located in [Your iPhone Device]\Internal Storage\DCIM\100APPLE. This means once you're in your iPhone's directory, click on the Internal Storage folder, then the DCIM folder, then the 100APPLE folder.
Step 5 - Transfer your photos
You can import your device's photos by selecting the ones you want, or pressing Ctrl+A to select them all, and dragging them onto your desktop. Or, you can hit Ctrl+C to copy the photos, and then hit Ctrl+V in the folder you want to copy them into.
Quite easy to transfer computer pics to flash drive via Windows Explorer:
1. Plug USB flash drive and iPhone to computer. iPhone will receive a prompt to approve it. Approve it and iPhone will be automatically detected by computer.
2. Open Windows Explorer and head to "iPhone > Internal Storage > DCIM". A list of photos on iPhone will show up.
3. Hold "Ctrl" and select photos you would like to transfer to USB stick and press "Ctrl + C".
Windows Explorer is pre-installed in Windows computer. In other words, you don't need to download or install any 3rd-party software to accomplish how to transfer photos from iPhone to USB stick. Within a few clicks, you are able to transfer iPhone photos to USB flash drive. Now learn how by the following steps.
1. Plug USB flash drive and iPhone to computer. iPhone will receive a prompt to approve it. Approve it and iPhone will be automatically detected by computer.
2. Open Windows Explorer and head to "iPhone > Internal Storage > DCIM". A list of photos on iPhone will show up.
3. Hold "Ctrl" and select photos you would like to transfer to USB stick and press "Ctrl + C".
4. Create a new folder in USB drive or find a folder, then press "Ctrl + V" to transfer iPhone photos to USB flash drive.
if u r using apple iphone then folow the steps install itunes in ur PC and connect the iphone then select the mode in the iphone open the itunes application ur iphone will show in that application it means u have successfully connected drag and drop the songs from my computer to i tunes application it will transfer Maybe what mentioned above is not useful for you, i personally share you with a article about transferring photos from Computer to iPhone


 If you're prone to find more effective ways to transfer computer pics to flash drive, just check out this tutorial:


×